XBCD - Getting those old controllers working again!
XBCD is an abbreviation for the "X-Box Controller Driver" Which has been around for almost as long as the Original Xbox Controllers themselves (approximately 2001-2003). As of 5/4/2017, the guide was updated to illustrate ways of installing these drivers which hopefully will answer the many questions that we get about them. This new method also no longer requires the test signing feature which also eliminates the requirement for UWD.exe which should make some of our subscribers happy.
"Note: If you get a black screen but the audio is playing. Or you got a potato PC and it's studdering. We have fallback Links below."
Video tutorial fallback mirrors:
In case you have no-script enabled or for some reason cannot see the title video on this website. We have provided direct links for these videos. For more information about the standards we use on this site click here if you would like to know more.
AV1       - Link
MP4/.h264 - Link
OGV       - Link
Disclaimers:
It should be noted like any hardware or software hack that S-Config is not responsible for any physical, mental, financial, or psychological damage that may happen when following this tutorial. The drivers and software provided are intended to work in an AS-IS base. We provide no guarantees this tutorial will work for your product. Also, this website contains internal links for binary files to which we highly suggest that you invest in a good virus checker prior to downloading anything off of the internet. Trust no one! For additional and general questions refer to the FAQ of this site.
History time!
Back in the days when Microsoft got involved with the console wars. They made a bunch of controllers for their X-Box units and people began to realize that if you just splice a USB cable on the end of the proprietary connection then you could use the Xbox Controller on your PC. Microsoft at the time really didn't want to associate hardware from their console with hardware from their PC because a few corporate people back then felt it would disenfranchise their user base from actually purchasing an Xbox.
Xbox 360 and onward.
It wasn't until the introduction of the Xbox 360 that Microsoft gave support for their users to use their beloved controllers on their PCs and other devices. Even then Xbox 360 controller support for PC users was released around 2008 giving a few-year gap between its initial release date in 2005. This dongle was designed to work with the "Games for Windows" logo during Windows 7. They also mentioned that this dongle would work with "all future Xbox 360 devices." That is of course until the Xbox One came out.
Since Microsoft was very quick the bury the Xbox original console this left a void of people wondering what to do with their old hardware. Well, one of those things to do is to recycle the controller onto your PC.
XBCD development cycle.
Like all things, XBCD development stopped as many thought it wasn't necessary to develop. I even posted a blog article talking about the Wireless Xbox 360 receivers and controllers and how awesome they were. Windows XP was the last officially supported version of XBCD 0.2.7 with some 32-bit work for Windows Vista. However, for those users that want to keep their controllers going in the year 2016, yet, there's a way to keep on rocking with these controllers.
Hardware Prerequisites for XBCD and how to hook it to your computer.
Lets get the hardware section out of the way first. If you ever picked up an original Xbox controller you will notice right away its proprietary connector that is attached to the joysticks. We need to convert that connection into something a little more usable for our PC.
You could buy a converter cable.
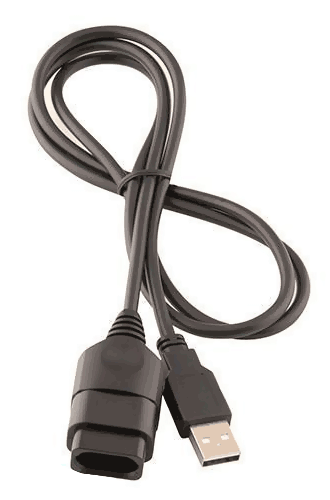 Ebay - has a large assortment of cables under $10 easy. Amazon - also has these cables available as well! Thanks to Mantis Toboggan M.D.4 for finding links and the proper name for these cables. Either link you choose to buy a cable just know that we don't make any money providing eBay or Amazon links and just do it as a service for those interested in purchasing the adapter versus building one.
Make your own Xbox to USB adapter.
Lucky for us, the wiring of the Xbox joysticks is very easy, simply strip the wires down, find a USB cable you don't mind destroying, strip that down, and match the colors within the cable to the appropriate selection. The only cable you do not connect is the yellow clock/timer chip. You could use a USB A Male to Xbox female connector out of a destroyed Xbox unit like I did to preserve your original Xbox Joysticks. Or if you no longer care about authenticity and just want to get that ultra-cheap controller working then you can simply cut the cable on that joystick and add the USB cable right onto it. 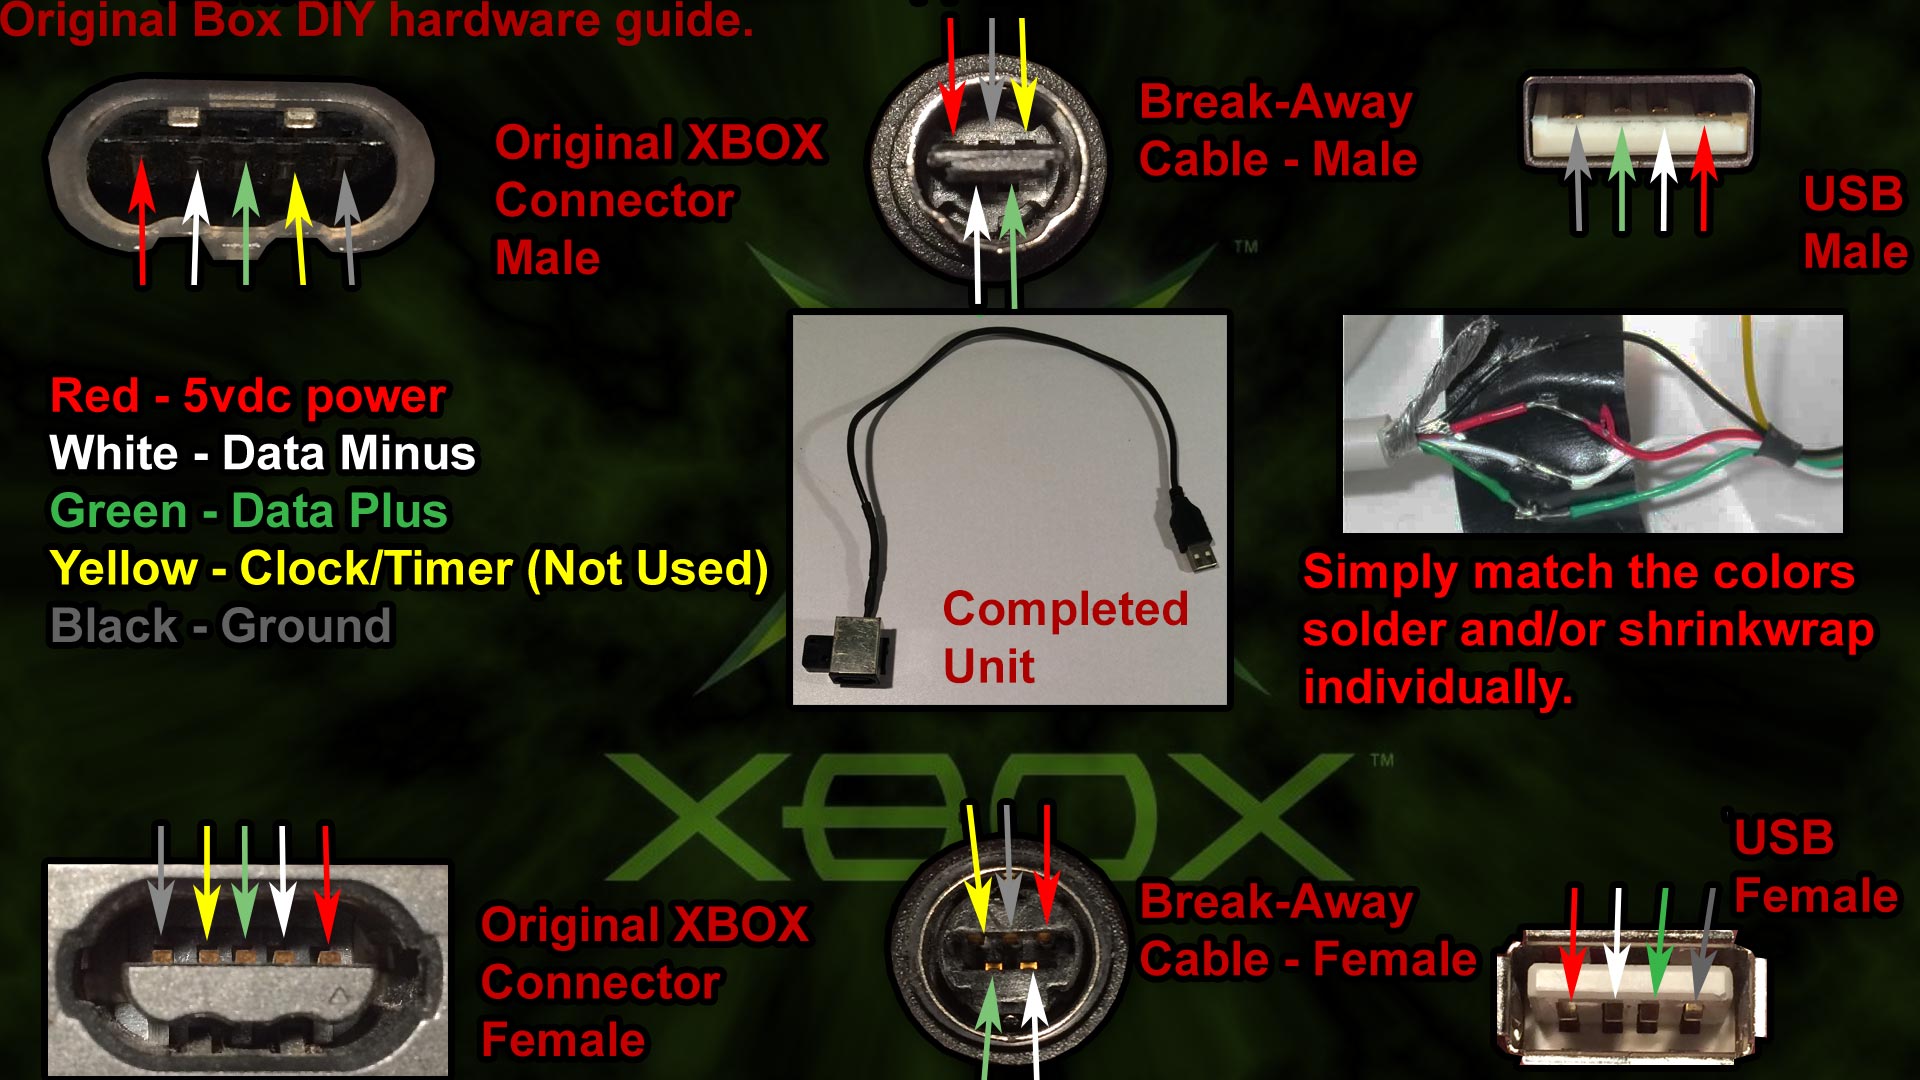 You could just wire twist them on and shrink tube them together, or solder them together and then use shrink tube (preferred). It does not matter so long as the cabling is secure as we don't want this to come apart as we're playing a game. It should also be noted that if you do have an original Xbox that by splicing an Xbox male connector and a USB female you can hook things up like a USB stick (limited compatibility restricted to 2GB) for save games as well as hooking up keyboards for some of the home-brew titles that exist out there.
 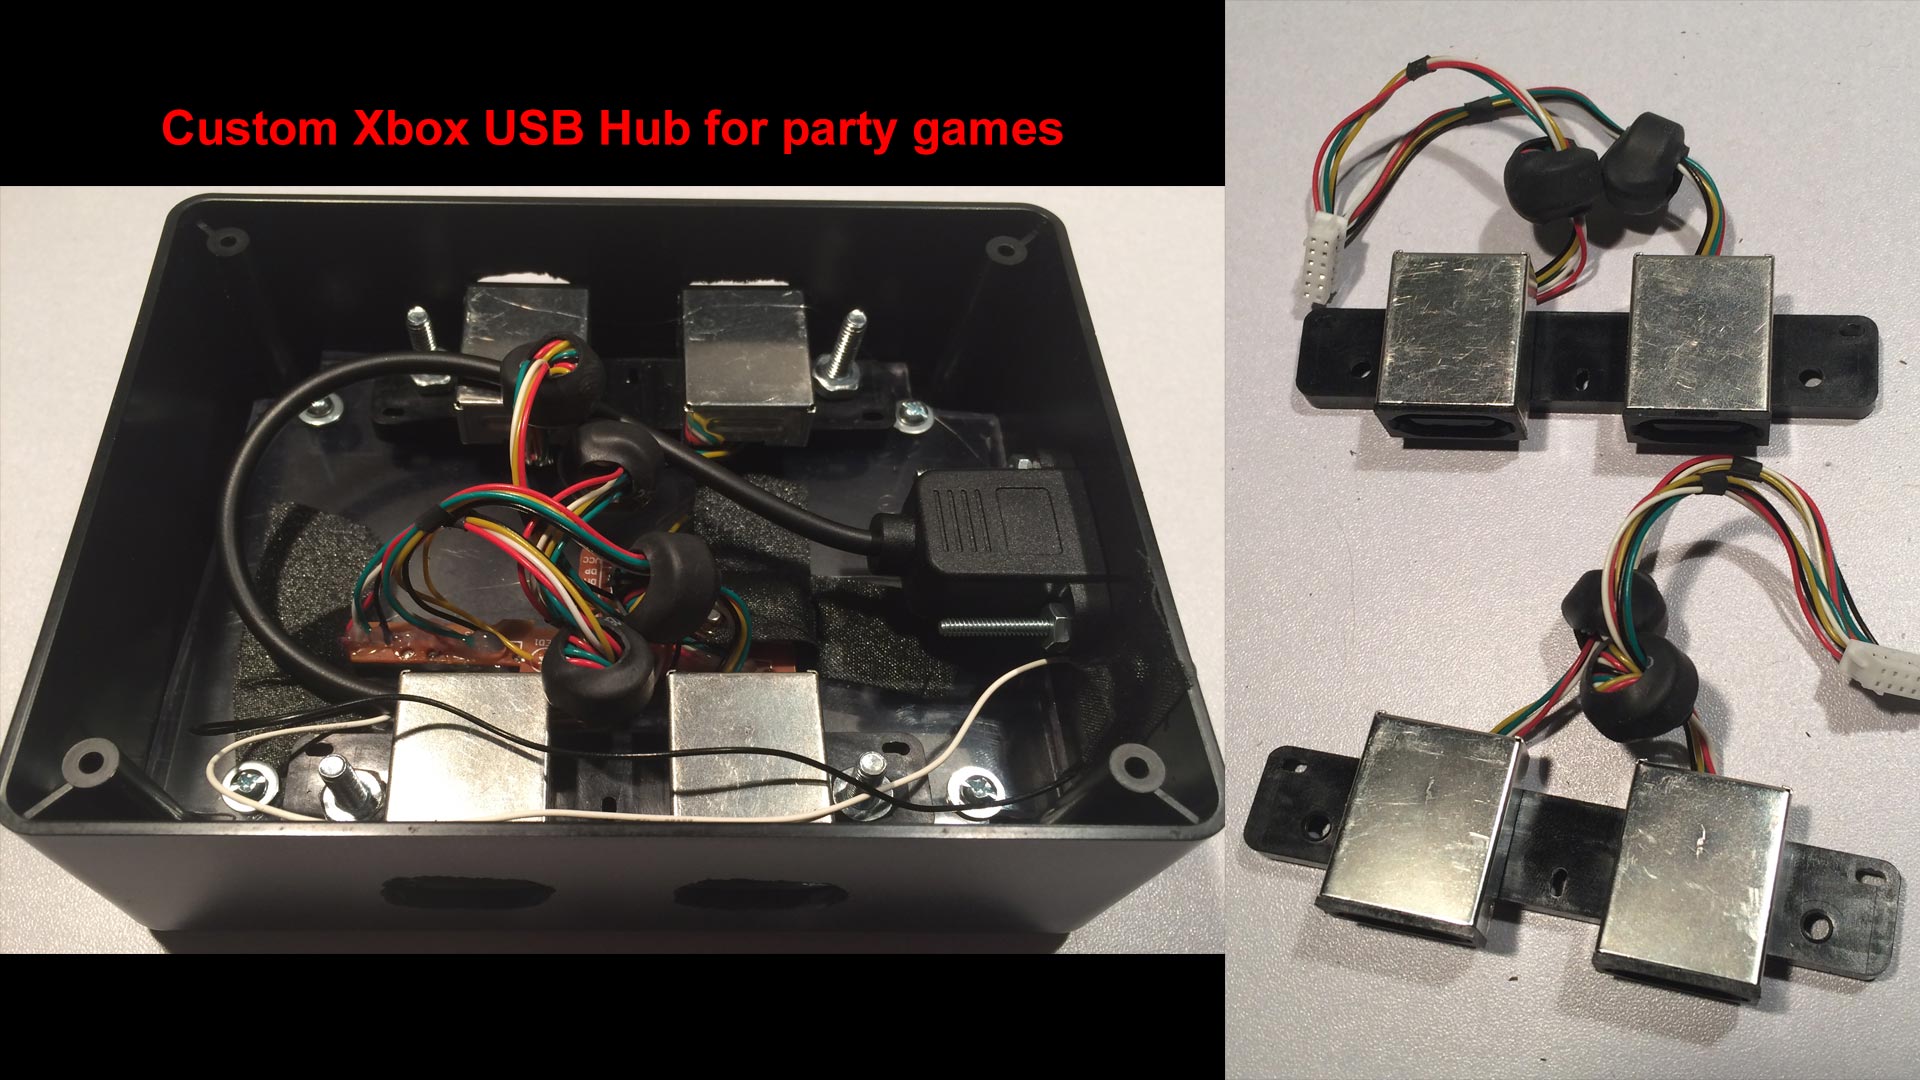 Back in the day when you upgraded your Xbox Original case sometimes the vendor didn't feel like removing anything from the front panel such as the control panel buttons and the Xbox connectors that they wanted users to transfer their guts over as quickly as possible. Since these were held in by a few screws they were easy to extract and easy to plug into my own little case for it. Using a Cheap USB hub can be soldered all of the connectors into a single box so you have a breakout box for party games.
Software Prerequisites.
Now we can finally talk about the software side of things to get it all working on your Windows box. Some of you may wonder why we host the files directly versus referring you off to a forum or another site. The answer is simple: 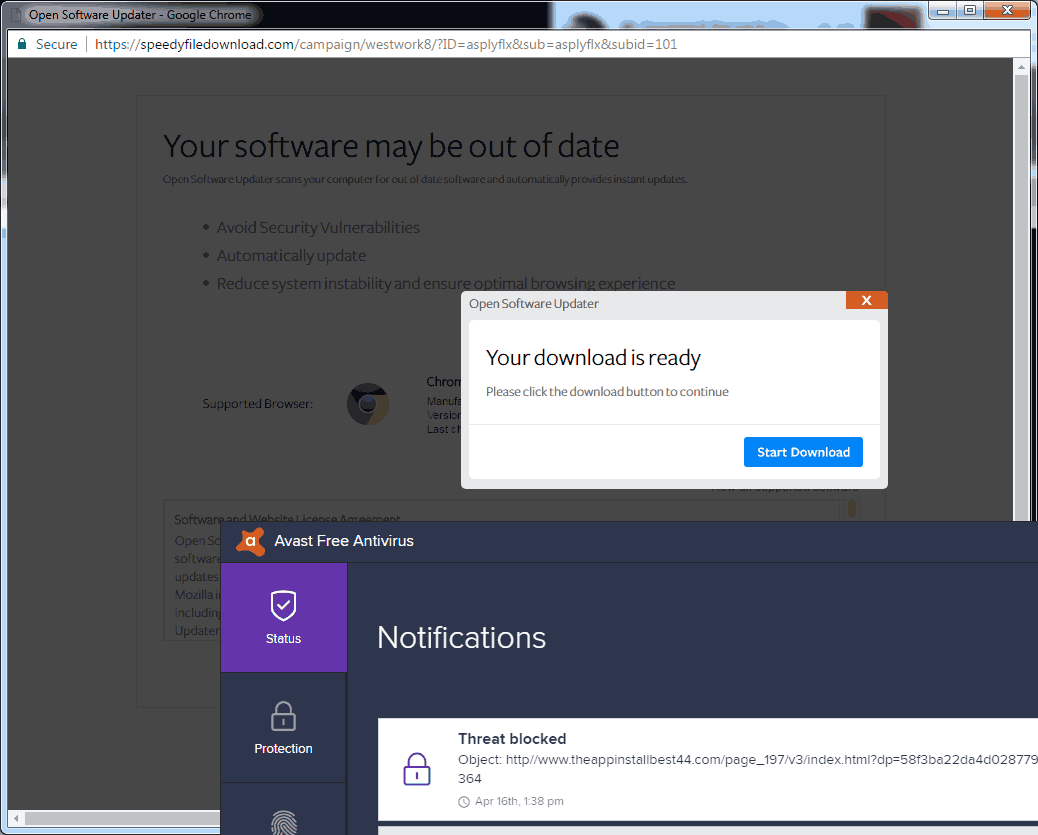
A tutorial should not infect your computer with spyware!
When visiting the forums which contained this driver we were getting redirected to an ad.fly pay-per-click service. This service refused to let us download the binary until we turn off the ad block. Upon turning off the ad-block ad.fly then produced a pop-under window which immediately began an attempt to install a Trojan onto an unsuspecting user's PC. This is what happens when you don't pay for storage. Eventually, someone else will pay for it and you won't like what they will do to your good name! Infecting people's PCs with spyware/malware/ransomware is totally counterproductive to what you are trying to do which is to make an old piece of hardware work on a modern computer. Unlike other sites which will route you through hell and endanger your PC. We are not going to do that to you. Because we love you too much.
 Direct link to the XBCD Software:
I have provided a direct link for everything that you need for XBCD.
Inside this archive:
- A Driver folder that has the same files that the XBCD script installs into C:\Program Files(x86)\XBCD\ . These are here for people who don't want to use the XBCD utility.
- A shortcut folder that has a shortcut to the XBCD utility since the installation script may not generate this shortcut automatically.
- x360ce-x32 and x360ce-x64 folders. These are utilities that help certain games acknowledge the fact that a legit Xbox 360 controller is hooked up when in fact it is not. Respectfully these are later versions than what XBCD installs into C:\Program Files(x86)\XBCD\ and can be used for games that require the presence of a true Xbox controller. All DLL files for Windows 10 are rolled into that folder too.
- disable.bat and enable.bat for turning off integrity checking within Windows 10 64-bit edition.
- As of 9/18/2017 shutdown-recovery.bat is a new addition that allows the user to manually disable integrity checking via recovery mode.
- XBCD_Installer_0.2.7.exe - the binary file itself!
Click on the download link on the right-hand side to go grab the file. Credit goes off to RedCl0ud for this wonderful software. Everything is open source and free for anyone to add/modify to it so go nuts. Note: The compression format has changed from .zip to .7z in accordance to our 7-zip blog entry. This does not change the video or blog tutorial in any way as WinRAR will extra 7-zip files just fine.
Extraction.
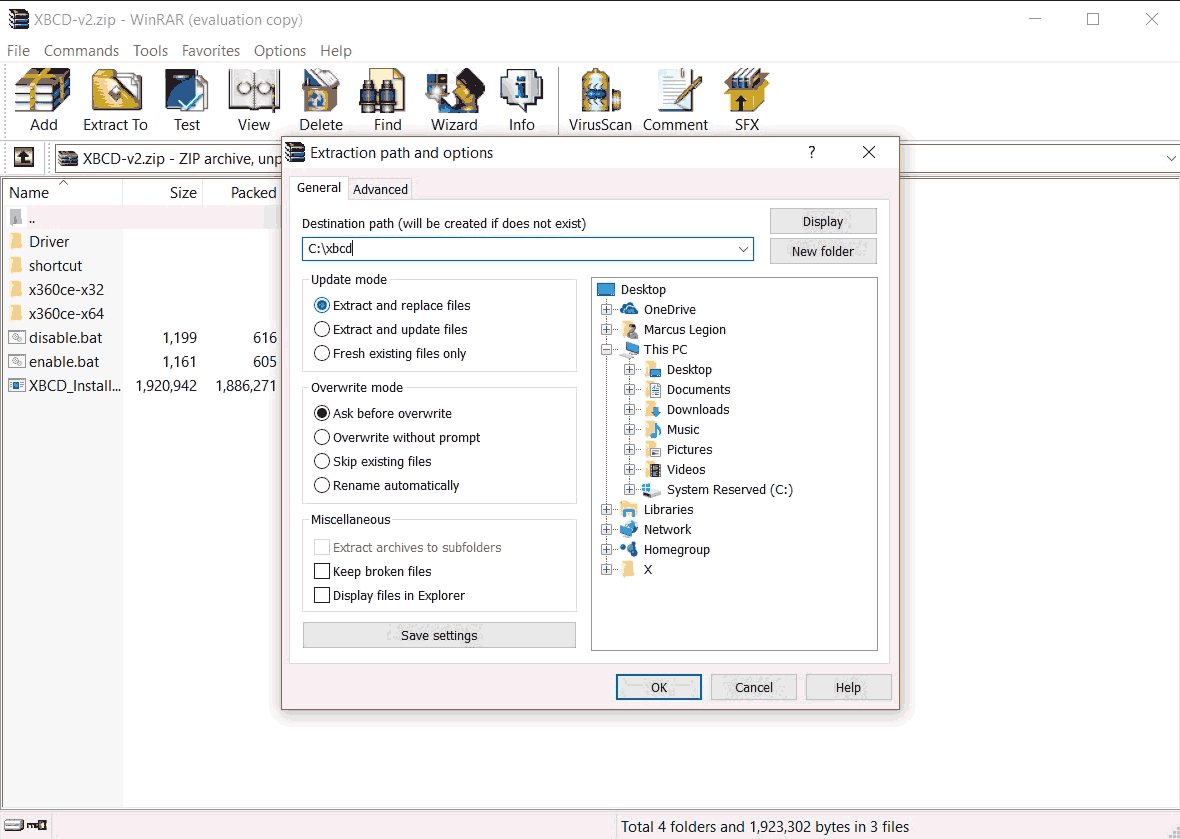 Using your favorite file extractor; Unzip all of these files to a folder you can remember. This tutorial is going to use C:\xbcd\ as the reference from here on out.
Hardware verification:
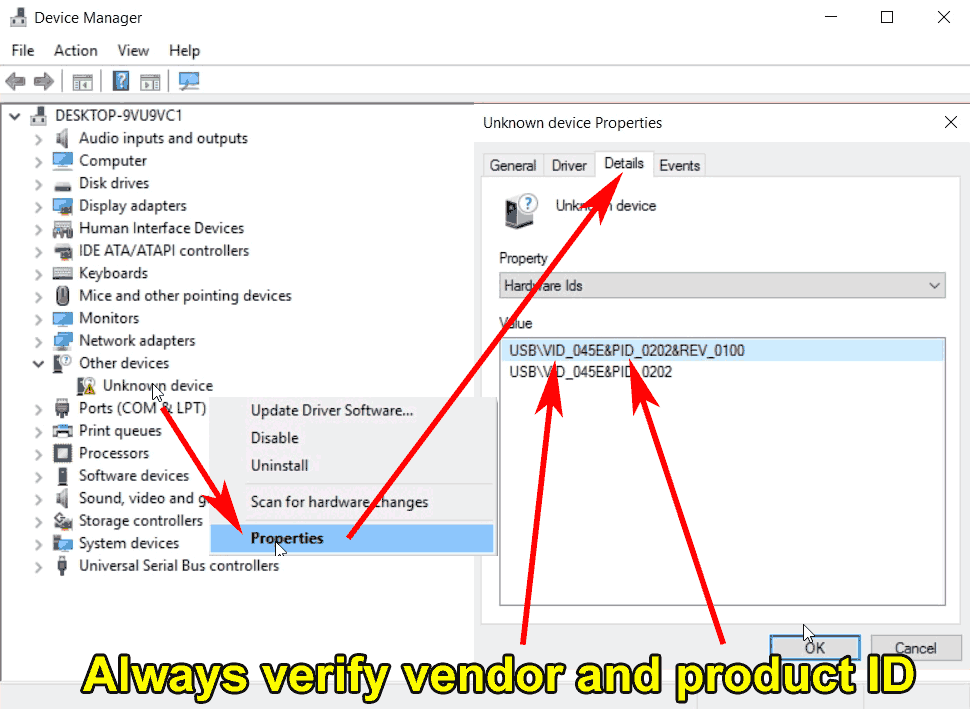 It's always a good idea to verify the hardware that is being installed whenever you are plugging in something new into your PC. This should be a habit that everyone does because it could save you hours of headaches installing drivers on the wrong device or if the device is not even detected properly. To access this either right-click on your start button or open the device manager. Or press the Windows + r key and type in the following.
mmc devmgmt.msc
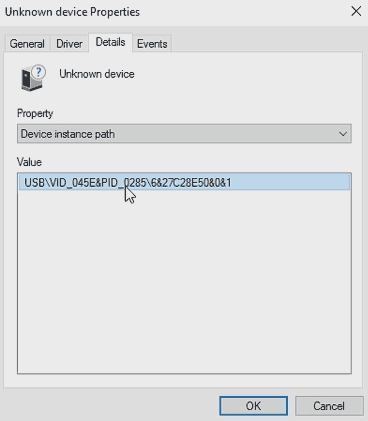
The device manager window will open up. Plugin your Xbox controller now and you should see the Device Manager flicker attempting to identify the USB device. It will ultimately list the device as "Unknown device" in the "Other Devices" category. Right-Click on the Unknown Device and click "Properties". Click on the Details tab and under the property drop-down box select "Hardware Ids" In the window above we have USB\VIS_045E&PID_020&REV_0100. A VID_045E.
This game-pad is a Microsoft Xbox and has a product ID of 0202 which is the Original Xbox "Duke" controller. Vendor IDs will change if you plug in third-party controllers like Madcatz or Pelican controllers. Product IDs will also change with a third party. But can also change if you plug in the original Xbox "Duke" Controller versus the original Xbox "S" Controller. As long as it produces an ID is the only thing we are looking for here. If you see a VID_0000&PID_0000 or VID_???&PID_??? . Then your computer cannot detect the controller and you need to stop right here and identify what is wrong with your Xbox controller such as possible bad wiring or if it needs more serious repair. Installing the driver will not help if you one of those two Hardware IDs.
Installing XBCD.
Great, I have the files, I can just launch XBCD_Installer_0.2.7.exe and I'm good to go right?
If you are running Windows 7, or Windows 10 32-bit then yes. This tutorial ends for you right about now. Windows 32-bit edition does not rely on heavy driver verification. 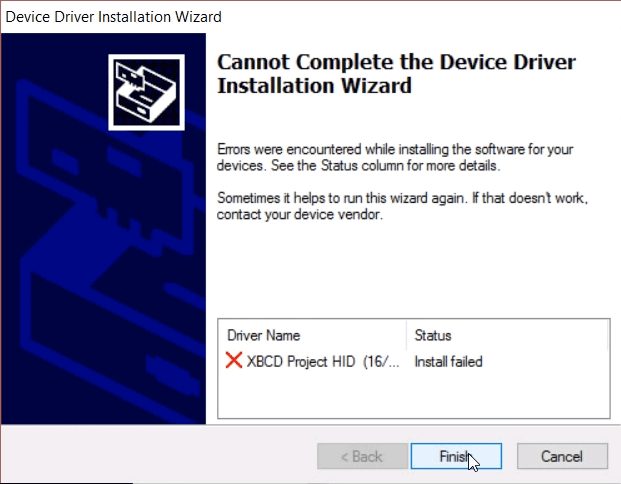 For the majority of users running windows 64-bit edition, this is the error that you will more than likely see if you attempt to run the setup file without doing anything. The setup files it doesn't really tell you why the installation failed. For that, we go back into the device manager.
 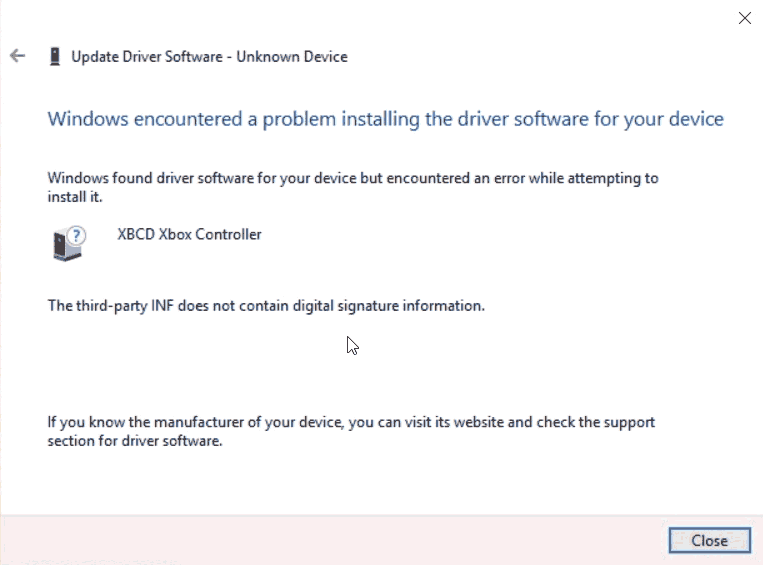 If you attempt to install the XBCD driver from C:\XBCD\driver via the device manager. We get a more precise error as to what is going on. Simply put our driver does not have an online certificate which costs $200+ dollars a year to make windows 64 happy. In order to get around this error, we are going to have to disable some of the security which is installed into Windows 10 64-bit.
Disabling integrity checking in Windows 10 64-bit.
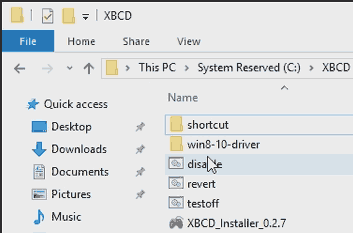 We have provided a file named disable.bat within the archive which attempts to automate this process for you by elevating itself to administrator status and passing all of the commands into the windows bootloader so that it can boot with integrity checking disabled. If you don't trust my batch files you have no right to trust me. Simply open a command line with administrative access and pass the following commands.
bcdedit -set loadoptions DISABLE_INTEGRITY_CHECKS
bcdedit -set nointegritychecks ON
And reboot the PC.
The script fails and still cannot install drivers. Disabling integrity checking manually.
Sometimes windows 10 gets incredibly obnoxious about drivers and we will continue to get digital signature errors. Here is how to totally disable integrity checking manually one time so we can install the driver. 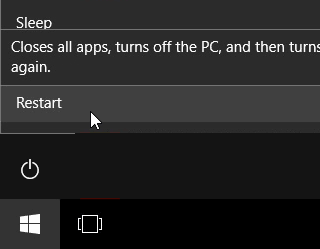 Click the Windows button then click on the power icon right above. While holding down your shift key and left-click the restart option.
Update 09/18/2017:
We have also included the shutdown-recovery.bat file in the XBCD-v2.zip file which simulates the same thing as holding your shift key down. If you do not like scripts and want to type this in yourself. You may do so by opening an Admin command prompt window and typing the following:
shutdown.exe /r /o
It will then give you a 10-second warning that it will now shut down your PC.
The GUI.
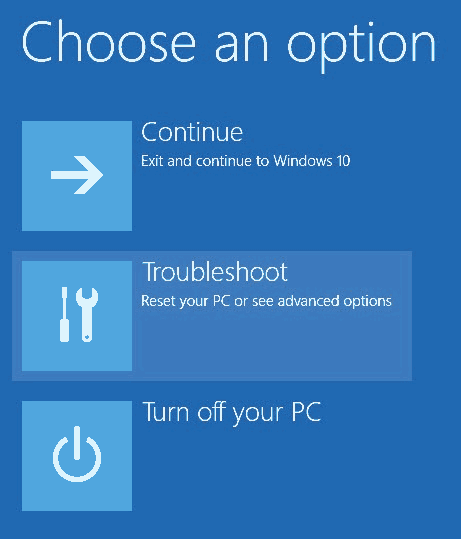 If you held down the shift key and press that restart button correctly you will be presented with a menu of something like what is above. Select Troubleshoot.
 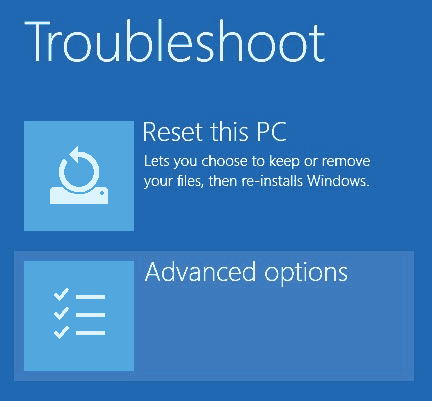 Select Advanced options.
 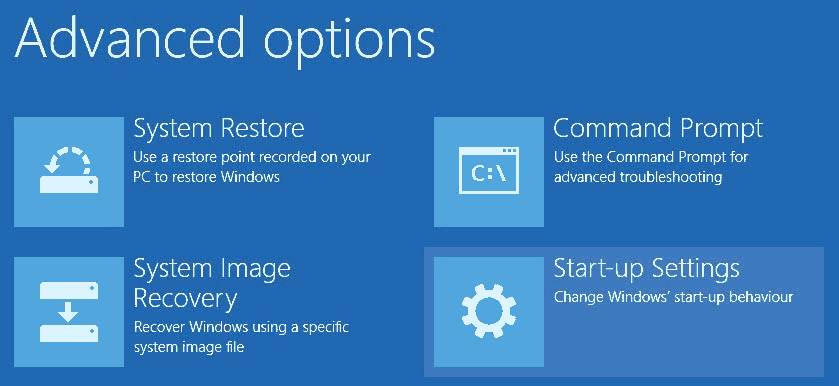 Select Start-Up Settings.
 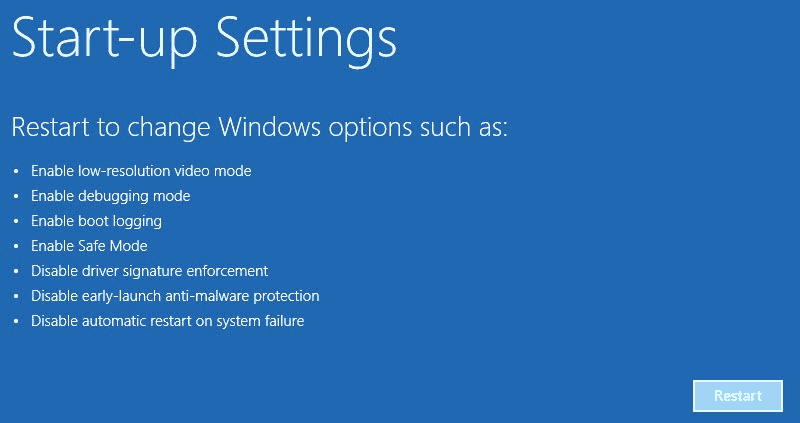 Finally, Select the "Restart" button and the computer will go into boot selection mode.
 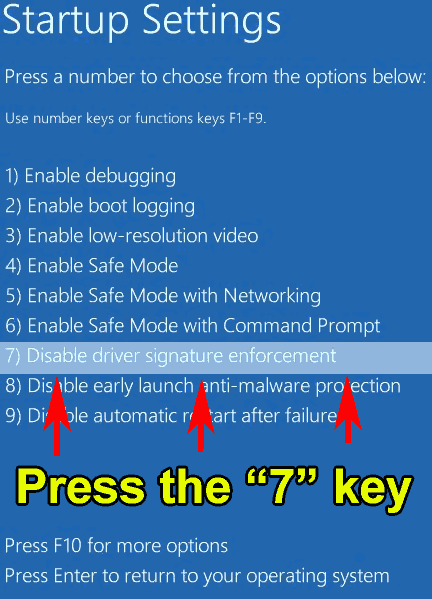 You will not have a mouse in this mode. simply pressing the 7 key will be enough for the OS to reboot once more allowing you to finally be in the mode that we want to install the driver. It should also be noted that manually disabling driver signature enforcement is only good for one reboot versus the script or command-line method which is a more permanent approach to disabling signature enforcement. If you only choose the manual method of disabling integrity checking then the next time you need to install a driver you will have to go through the manual process again.
Installing the driver for XBCD
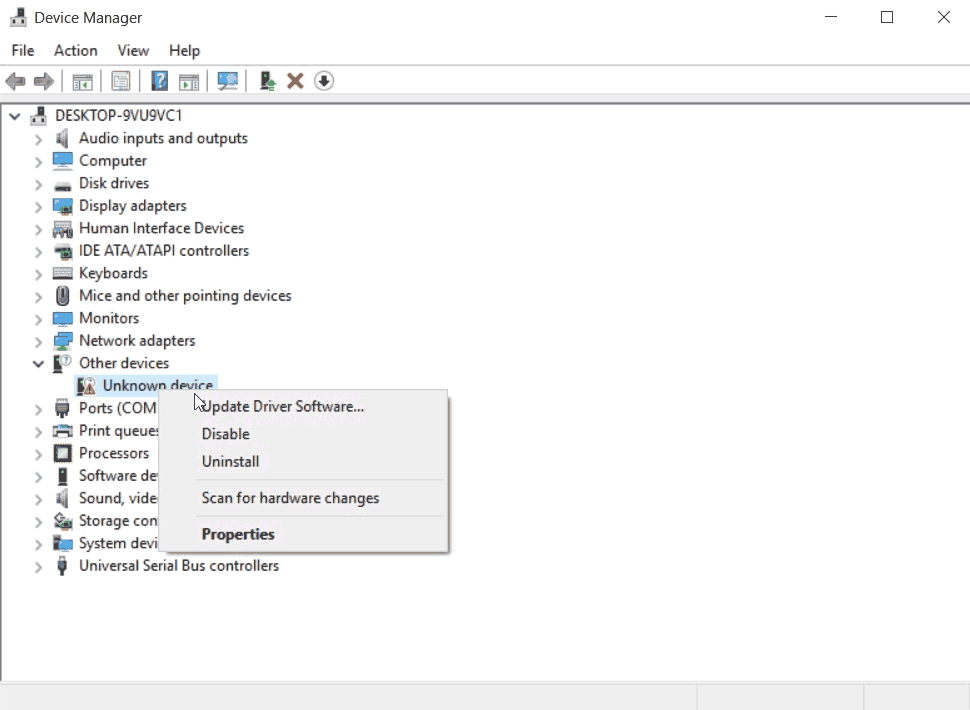 Now that we have straightened out integrity checking you may not want to run the XBCD wizard again. After all the XBCD control panel is installed and the driver installation wizard isn't all that helpful. So let's do this manually. Go back into the device manager and right-click on our unknown device which we confirmed was our Xbox controller earlier. Select "Update Driver Software."
 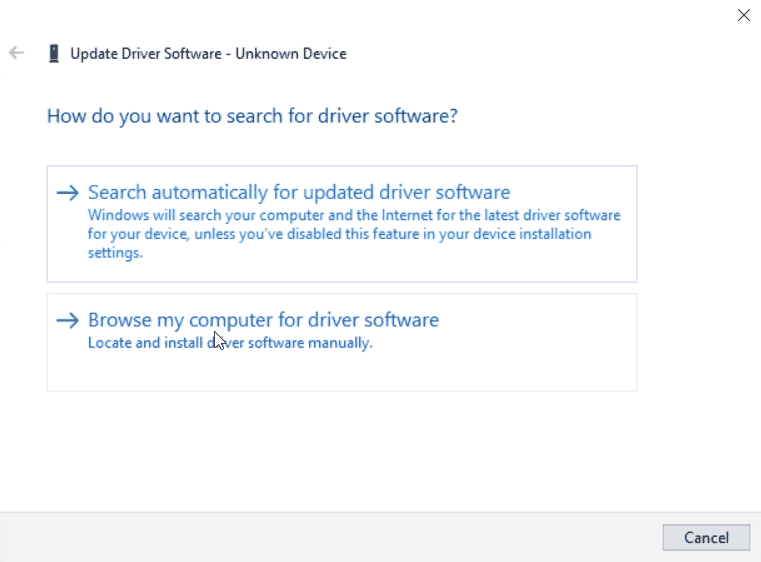 We wish to select "Browse my computer for driver software"
 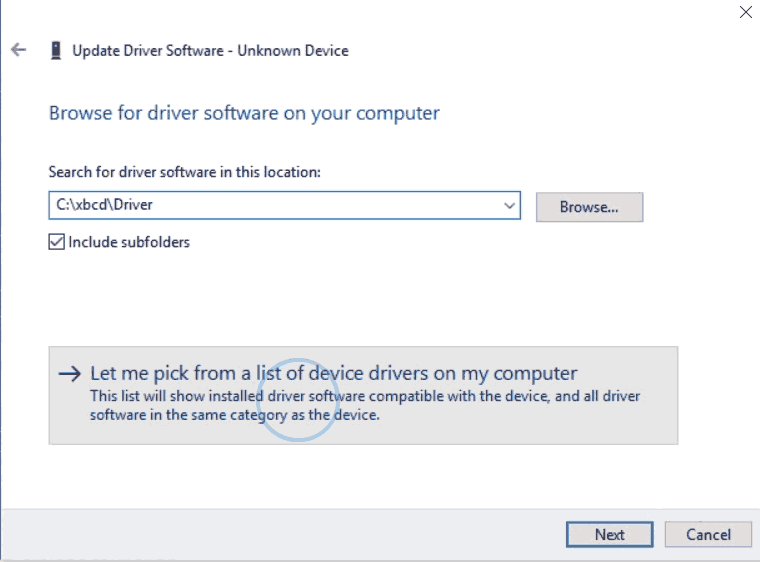 In general we don't trust Windows in doing anything right. Select "Let me pick from a list of drive drivers on my computer."
 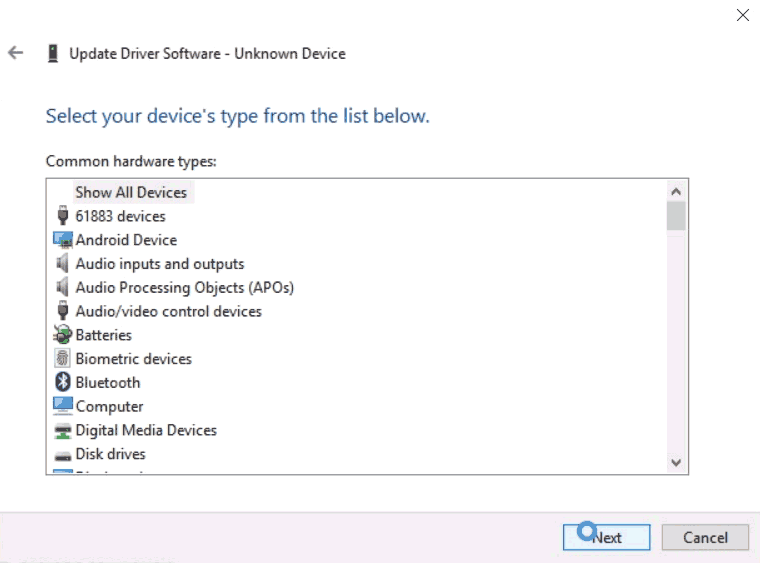 The default selection of "Show All Devices" is fine. Click Next to continue.
 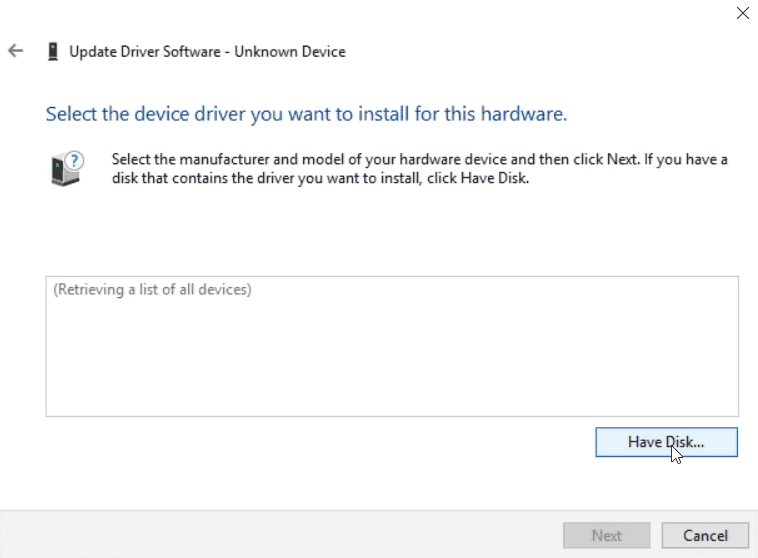 Select the "Have Disk..." button to continue.
 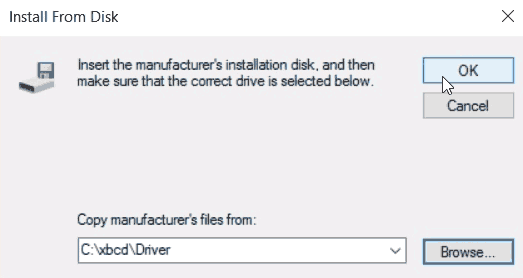 You can click the "Browse" button to find the folder that our driver is in. You may use the provided driver in C:\xbcd\Driver or you may also use the driver that the XBCD installer provides in C:\Program files(x86)\xbcd\Driver\ it does not matter. Once you have selected your folder click "OK" to continue.
 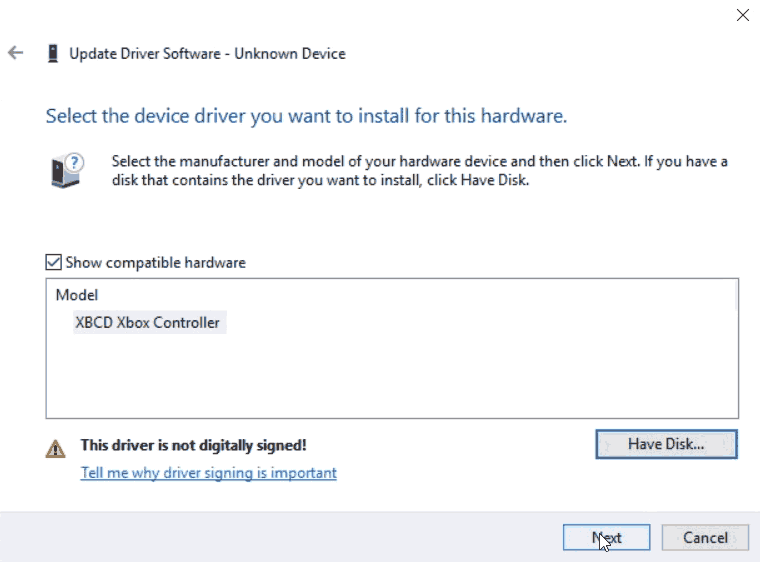 It finds out controller which is good. If it does not then check the Hardware ID of your unknown device. Click Next to finally install this driver.
 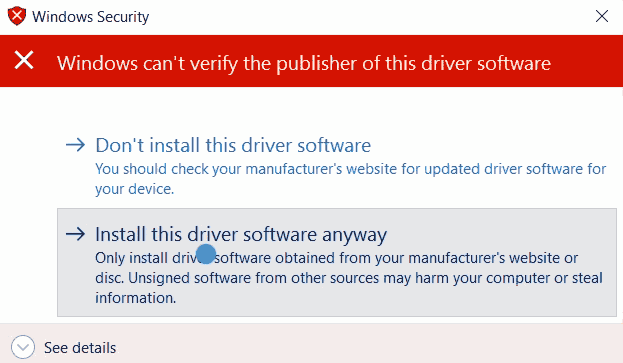 Now that driver integrity checking is disabled we are welcomed with something a little more retro which is this window warning us that it can't verify the driver. This is very good. Click "Install this driver software anyway" and it should begin loading the XBCD driver into your Windows 10 64-bit box.
 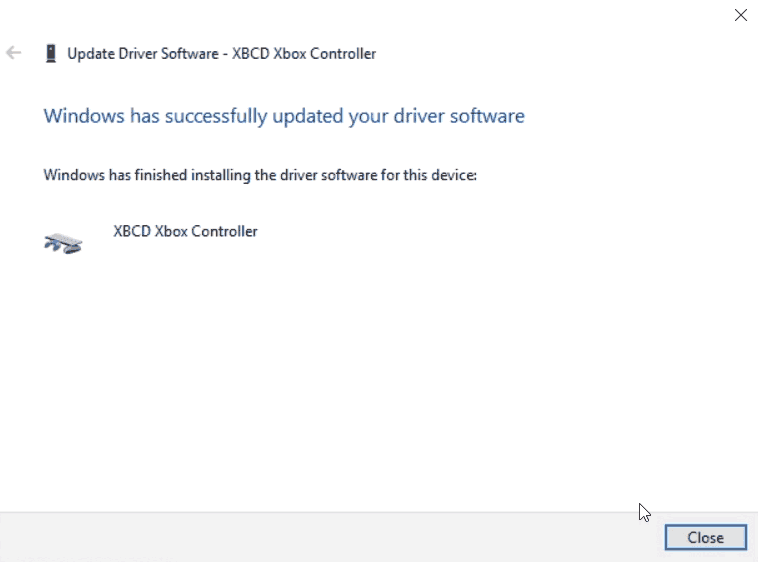 Driver installation is now complete.
 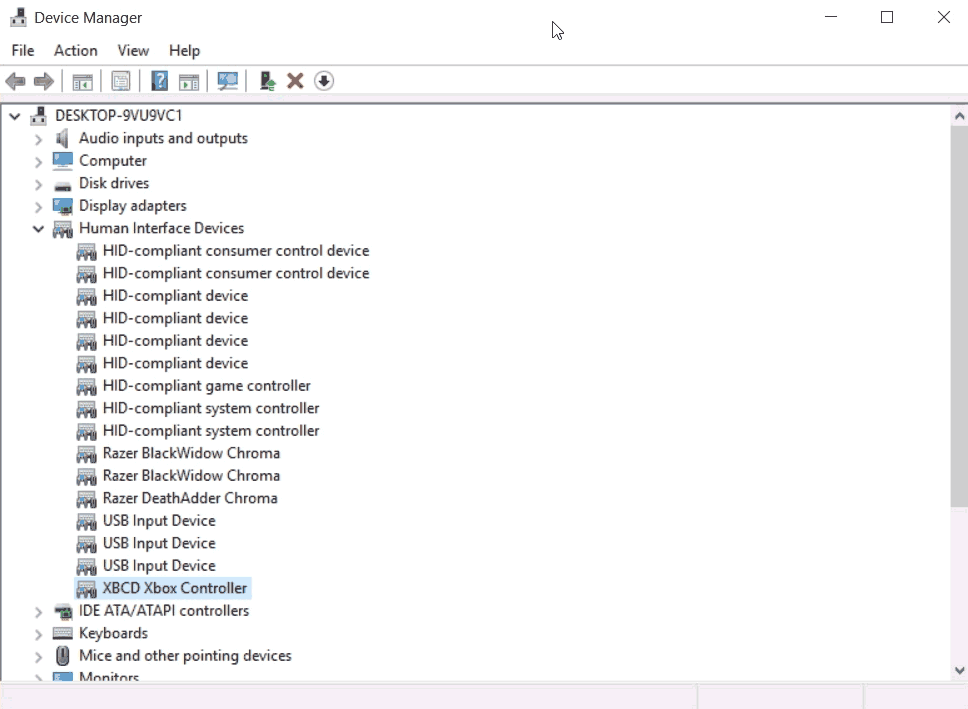 The XBCD Xbox Controller driver now takes its place in the Human Interface Device category of device manager. Installation is complete and onward to the testing.
Testing the XBCD joystick..
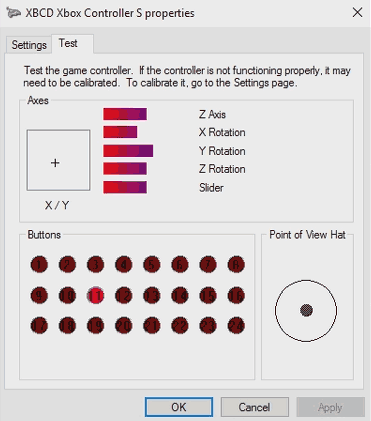 To pull up the window above. You can press the window key + R to bring up a run prompt and type in:
joy.cpl
Then click on the Properties button. 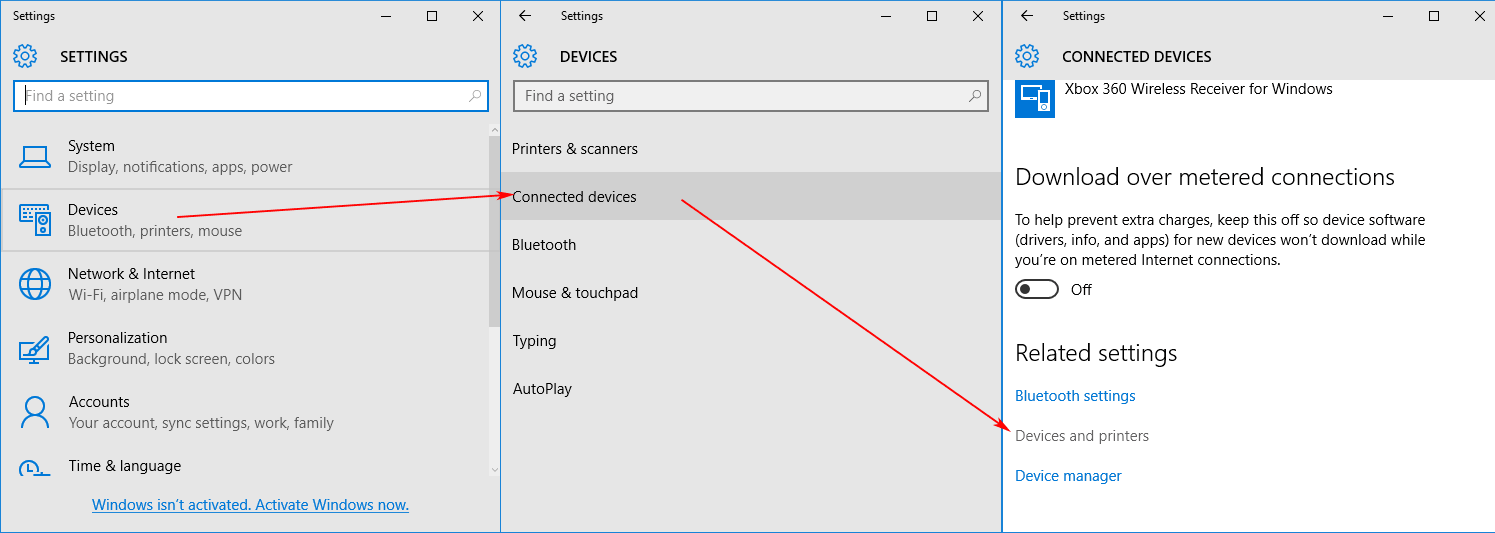 Alternatively, you can click on your windows logo and click on settings, devices, connected devices, and scroll down to devices and printers.
 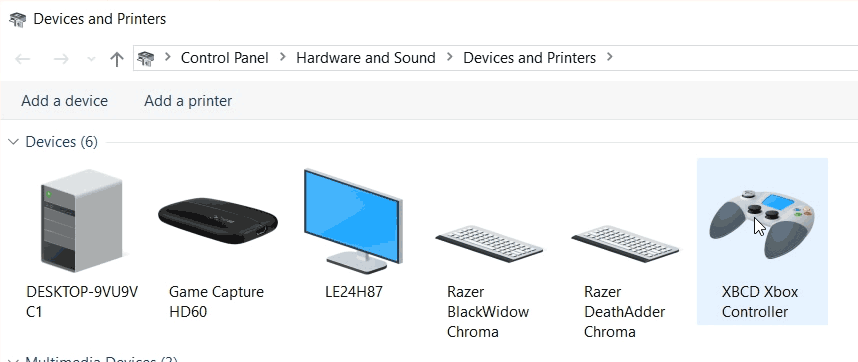 From here you can right-click on the XBCD Xbox Controller and click properties.
  But you'll notice something is different from a regular Xbox 360 controller, it is recording a lot of buttons, and the shoulder buttons are recognized as digital buttons which could mess you up in certain games that assume that every player out there has an Xbox 360 or Xbox One controller hooked up to their PC.
 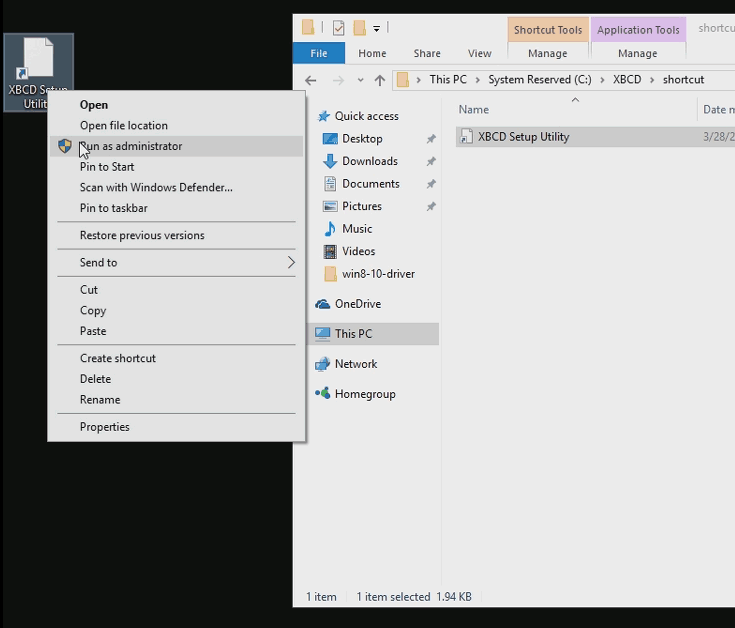 Since the XBCD installation utility is very old it may not generate the necessary shortcuts for you in windows 64. I have made my own shortcut under the C:\XBCD\shoutcut folder that you can copy out to the desktop. Once you have it on your desktop. Right-click on it and Run as administrator. If you fail to run this program as an administrator it will error out on you.
 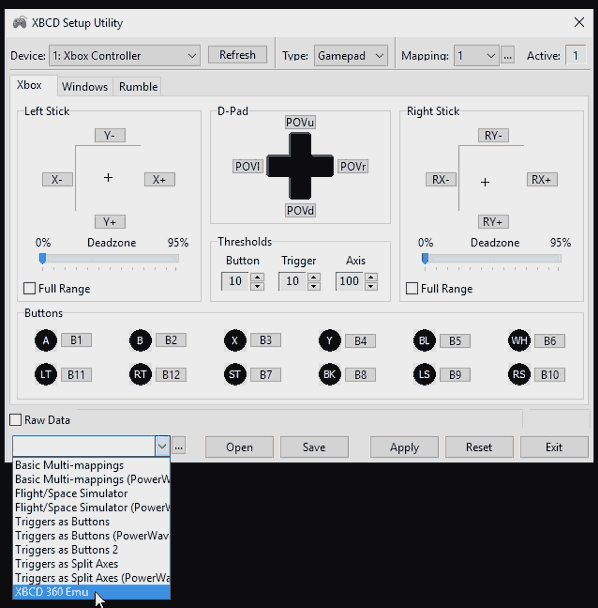 Once you have the XBCD utility launched you can then select a profile of XBCD 360 Emu and click the Apply button. It will then change the personality of your default classic Xbox controller into something more like the Xbox 360 controller for games on windows. This utility is insanely powerful as you can remap buttons and even accesses to digital pads which is very useful if you so happen to have any Dance Pads as you cannot hold both left-right pots down simultaneously with the default windows joystick mapping.
 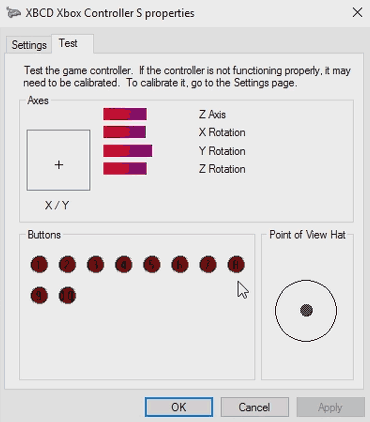 Now if you go back to your windows joystick test program, you will see that the layout is behaving more like a standard Xbox 360 controller and your shoulder buttons are back with their analog hat feel to them.
Disclaimers, security, and integrity concerns about Windows 10:
But S, isn't it dangerous to run windows 64 bit with the integrity checking disabled and test signing on?
I'm no MCSE expert but I'm going to say "Yes." However, it makes you about as vulnerable as a windows 7 box. Microsoft keeps adding more and more layers of security to their OS in the hopes of keeping bad things out such as malware and ad-ware affecting the very core of your operating system. Turning off those sections could invite some of those in maybe. But if you are like me and have a dedicated PC assigned to couch gaming or emulators if something or someone breaks into it it's a low-risk item and thus you can simply USB stick reload it and get back to normality. If you are on a PC with highly sensitive data then you probably shouldn't be doing this level of hacking/modding to your windows 10 box. Please consider purchasing an Xbox One controller and receiver if you are uncomfortable with hacking and want a controller that can integrate seamlessly into Windows 10.
Public Driver Signature.
Going through the grueling process of getting the XBCD driver publicly certified underneath windows 10 is one option available to avoid going through all of the hacking with "Test Mode". Also, allowing the driver to install just like windows XP and 7.
S, can you make a publicly signed version of this driver for us?
Costs money to do it. The last time I checked it costs around $200(USD)/yr to maintain a valid domain signature to assign to drivers that are personally made. The team the developed XBCD is all open source. So if someone wants to get the public certification to do it by all means! It would save me from having to write out all of this!
Devices compatible with XBCD.
 Pulling directly from the xbcd.inf file is a list of vendor IDs you may find within the device manager that will verify that your controller does indeed work with the XBCD driver. Keep in mind these are only the drivers detected. If you have a controller not listed here you can manually install but success may not be guaranteed. For example, my Pelican Wireless Controllers and my Pump-It-Up Dance Pads for Xbox I had to manual install and it works despite not being on the driver's listing.
Original Xbox Controller for XBCD
| Vendor / Product ID | Control Type | Description |
|---|---|---|
| USB VID_3767&PID_0101 | Steering Wheel | Fanatec Speedster 3 Forceshock |
| USB VID_0E8F&PID_0201 | Steering Wheel | Gamexpert PS2/GC/Xbox Steering Wheel |
| USB VID_06A3&PID_0200 | Steering Wheel | Saitek Racingwheel |
| USB VID_062A&PID_0033 | Steering Wheel | Competition Pro Steering Wheel |
| USB VID_044F&PID_0F10 | Steering Wheel | Thrustmaster Modena GT |
| USB VID_044F&PID_0F03 | Steering Wheel | Thrustmaster Wheel |
| USB VID_044F&PID_0F00 | Steering Wheel | Thrustmaster Wheel |
| USB VID_FFFF&PID_FFFF | GamePad Controller | PowerWave Xbox Controller |
| USB VID_0F30&PID_0202 | GamePad Controller | Big Ben XS Xbox Controller |
| USB VID_0E6F&PID_0008 | GamePad Controller | After Glow Pro Controller |
| USB VID_0E4C&PID_3510 | GamePad Controller | Radica Gamester |
| USB VID_0C12&PID_880A | GamePad Controller | Nyko Xbox Controller |
| USB VID_0C12&PID_8802 | GamePad Controller | Nyko Air Flow |
| USB VID_0C12&PID_8801 | GamePad Controller | Nyko Xbox Controller |
| USB VID_0C12&PID_0005 | GamePad Controller | Intec wireless |
| USB VID_0738&PID_4588 | GamePad Controller | MadCatz Blaster |
| USB VID_0738&PID_4586 | GamePad Controller | MadCatz MicroCon Wireless Controller |
| USB VID_0738&PID_4556 | GamePad Controller | MadCatz Lynx Wireless Controller |
| USB VID_0738&PID_4536 | GamePad Controller | MadCatz Microcon Xbox Controller |
| USB VID_0738&PID_4526 | GamePad Controller | MadCatz 4526 |
| USB VID_0738&PID_4520 | GamePad Controller | MadCatz Control Pad Pro |
| USB VID_0738&PID_4516 | GamePad Controller | MadCatz 4516 |
| USB VID_06A3&PID_0201 | GamePad Controller | Saitek Adrenalin |
| USB VID_05FE&PID_3031 | GamePad Controller | Chic Controller |
| USB VID_05FE&PID_3030 | GamePad Controller | Chic Controller |
| USB VID_046D&PID_CA88 | GamePad Controller | Logitech Thunderpad |
| USB VID_046D&PID_CA8A | GamePad Controller | Logitech Cordless Precision |
| USB VID_045E&PID_0289 | GamePad Controller | Microsoft Xbox Controller S |
| USB VID_045E&PID_0287 | GamePad Controlelr | Microsoft Xbox Controller S |
| USB VID_045E&PID_0285 | GamePad Controller | Microsoft Xbox Controller S |
| USB VID_045E&PID_0202 | GamePad Controller | Microsoft Xbox Controller |
| USB VID_044F&PID_0F07 | GamePad Controller | Thrustmaster Controller |
Xbox 360 Controllers for XBCD
| Vendor/Product ID | Control Type | Description |
|---|---|---|
| USB VID_12AB&PID_8809 | StepPad Controlelrs | Konami DDR Pad |
| USB VID_12AB&PID_0004 | StepPad Controllers | Konami DDR Pad |
| USB VID_0C12&PID_8809 | StepPad Controllers | RedOctane Ignition Pad |
| USB VID_0738&PID_6040 | StepPad Controllers | MadCatz Beat Pad Pro |
| USB VID_0738&PID_4743 | StepPad Controllers | MadCatz Beat Pad Pro |
| USB VID_0738&PID_4740 | StepPad Controllers | MadCatz Beat Pad 360 |
| USB VID_0738&PID_45FF | StepPad Controllers | MadCatz Beat Pad (w/ Handle) |
| USB VID_0738&PID_4540 | StepPad Controllers | MadCatz Beat Pad (w/ Handle) |
| USB VID_1430&PID_4748 | Guitar Controller | RedOctane X-plorer Guitar |
| USB VID_046D&PID_CAA3 | Steering Wheel | Logitech DriveFX Wheel |
| USB VID_1BAD&PID_F900 | GamePad Controller | Afterglow AX.1 Wired controller |
| USB VID_1BAD&PID_F502 | Stick Controller | Hori HRAP VX-SA |
| USB VID_1BAD&PID_F501 | Stick USB VID_1BAD & PID_F900 Controller | HORI Pad EX2 Turbo |
| USB VID_1BAD&PID_F016 | GamePad Controller | Mad Catz Xbox 360 GamePad |
| USB VID_162E&PID_BEEF | GamePad Controller | Joytech SE for 360 |
| USB VID_0F0D&PID_000D | Stick Controller | HORI EX2 Fighter Stick |
| USB VID_0F0D&PID_000C | Stick Controller | HORI Pad EX Turbo |
| USB VID_0F0D&PID_000A | Stick Controller | HORI DOA4 Stick |
| USB VID_0E6F&PID_0201 | GamePad Controller | Pelican XSZ Wired Controller (Model #PL-3601) |
| USB VID_0738&PID_BEEF | GamePad Controller | Joytech NEO Se Advanced |
| USB VID_0738&PID_B738 | Stick Controller | Madcatz Arcade Fightstick Tournament edition. |
| USB VID_0738&PID_4738 | Stick Controller | MadCatz Arcade Gamestick (Street Fighter IV Fightstick TE) |
| USB VID_0738&PID_4736 | GamePad Controller | MadCatz 360 MicroCon |
| USB VID_0738&PID_4728 | Stick Controller | MadCatz Street Fighter IV |
| USB VID_0738&PID_4726 | GamePad Controller | MadCatz Pro for Xbox 360 |
| USB VID_0738&PID_4718 | Stick Controler | MadCatz Street Fighter IV Fight Stick |
| USB VID_0738&PID_4716 | GamePad Controller | Madcatz Xbox 360 Controller |
| USB VID_06A3&PID_F51A | GamePad Controller | Saitek P3600 |
| USB VID_046D&PID_C242 | GamePad Controller | Logitech Chillstream |
| USB VID_045E&PID_028E | GamePad Controller | Microsoft Xbox 360 Controller |
Unsupported devices by XBCD
| Vendor/Product ID | Control Type | Description |
|---|---|---|
| USB Vid_045E&Pid_0719 | GamePad Controller | Microsoft Xbox 360 Wireless Controller |
You can simply visit the blog about wireless controllers if you have a problem with the wireless Xbox 360 Controllers.
Notes about modern gaming.
Check out the x360ce tutorial to provide xinput version 1.2 and 1.3 for modern games.
It should be noted that the old XBCD driver only gives support for classic xinput version 1.0. Whereas a lot of modern games are expecting xinput 1.2-1.3. This is why in many cases the joy.cpl calibration will work perfectly fine but a modern game simply refuses to detect the aging Xbox controller. I have created an addendum blog to this called the x360ce utility which allows you to apply a patch to use xinput 1.0 in games that refuse to do so.
Final thoughts.
It's still amazing that you can get controllers from almost 15-16 years ago operating on the latest operating system and computers. It's a perfect solution for those who are looking for cheap controllers. You can find these controllers at various thrift stores and other surplus stores ranging from $1-5 USD. The value can of course change as time moves on and these controllers start to build collectors' value. You can also mess with people by showing them the original Xbox controller named "The Duke" because you needed man-hands to use it!:) I compiled this tutorial because we were getting tired of searching through dead-end forums over and over again. I hope you find it useful.
Until then, have fun, and server protect you.
END OF LINE+++

Hello, first at all thanks for making this tutorial, it helped a lot ^-^/
So I can't get my controller to work in win10 ver 1903, I installed the driver and all but get no input from it, is there a reason which could be causing this? is xbcd just incompatible now? I'm using a knockoff controller and it detects it as a "XBCD PowerWave 360 Shape"
I tried installing XBCD on another computer, this time with windows 7 and it worked perfectly there :/
If you are able to get it working on a windows 7 box but not the windows 10 box. the first thing i would be checking is seeing if device manager is throwing a yellow exclamation mark on your driver saying that signature enforcement is enabled. This is one of the hyper-annoying things with XBCD that the drivers are not signed. But feat not, there is signed drivers out there. check out the mayflash driver tutorial and that may help you out a little better then the xbcd tutorial.
peace!
- S
Hello, I search to install xbcd because my afterglow wired controller for Xbox 360 doesn't work (I used it to play on my pc) : I have a problem with my joystick on the left.
But I can't find the file for download xbcd on your web site, can you help me please ?
There's a red download button in the blog for the files. Since you're playing with an afterglow 360 controller the XBCD may not be the best solution and some of the 360 tutorials may be better for you such as this one. Instead of following the instruction for a receiver. choose the Xbox 360 controller driver instead.
Anyhow, hope it works out !
Thank you so much, even in 2019!!! ;D
Still having some problems, no controller is shown in game, but I know my old joy box, it was always a little pain. ;D
It really helped a lot, bundled up together, still online, just great!
Thanks for checking out the blog!
Now some games are expecting an xbox 360 controller which uses the more modern directX inputs. a way of patching it is to try and use the x360ce utility.
Good luck!
For Use in Stepmania.
For those who use food pad for xbox:
(konami dance pad)
Device: Xbox Foot Pad.
*Xbox battle:
Buttons: 10
Triggers: 10
Axis: 10
LB: None
RB: None
LT: None
RT: None
LS: None
RS: None
In Pod: D-pad as buttons. (Without crosshead or POV.)
Up B5
Down B9
Left B10
Right B6
Left and Right Stick are not used.
*Windows battle
Unmark all boxes.
*Battle of Rumble
It is not used.
Save and Apply
Note: Use this configuration as a reference, but do not indicate that it works in all dance commands.
Thanks for the info!
Hello,
I had to manually disable integrity checks, but when I installed the drivers i got an error. It says "A service installation section in this INF is invalid." Do you know what could be the problem?
Sound like automatic driver detection was blocked. Do a manual installation by doing an update, picking the driver manually, point it to your C:\XBCD\drivers\ folder and select the INF file directly.
Code 39
Did you disable secure boot? That's usually what causes Code 39.. The driver is interrupted because of the security of windows 10.
After I disabled Signature enforcement manually, some of the drivers installed under Human Interface Drivers except for the one "XBCD Xbox controller". Theres a yellow sign on it, and when I try to update driver software it says,
"Code 39 : Windows cannot load the device driver for this hardware. The driver maybe corrupted or missing."
(BTW, I'm using Windows 10 pro), I hope you find a solution for me.
Thank You.
I had this problem (“Code 39 : Windows cannot load the device driver for this hardware. The driver maybe corrupted or missing.”) when I attempted to install the driver manually from Device Manager (i.e., not using the XBCD Installer). After this failure, I successfully installed the driver using the following steps (assuming already running with Driver Signature Enforcement disabled via Windows 10 Start-up settings)
1. Uninstall the broken XBCD driver using Device Manager
2. Run XBCD_Installer_0.2.7, following the prompts
3. Restart
I then ran "joy.cpl" from the Run prompt to verify my original XBox controller was working. :)
Hi, I was keen to get all of my old Xbox controllers working for some retro gaming on my PC, but I'm having quite a few issues which hopefully you guys can help with.
I got the official Xbox Controller S (Halo green) working right away, so I know that driver signing was disabled successfully. I also have two wireless controllers - A Logitech Cordless Precision and a Joytech Neo S controller.
The VID/PID for the Logitech was in the inf file, but I get a Code 10 when I plug the controller in. If I go into device manager and disable/enable the device it eventually works after 30 or so tries. Any idea what could be causing this?
The Joytech controller has a VID/PID not in the inf (USB\VID_102C&PID_FF03), so I added it and it works fine now. The controller has a weird name in joy.cpl - "7 axis 24 button device with hat switch"... is that normal?
Lastly, I have two Radica Gamester Arcade sticks which I am very keen to get working (for MAME etc). The VID/PID differs slightly to the one in the inf (USB\VID_0E4C&PID_A103 instead of USB\VID_0E4C&PID_1103). But I added that in and I can install the driver ok. It shows up in Device Manager and joy.cpl as "XBMC Xbox Arcade Stick", but the stick and button presses do not register at all. I have tried reinstalling a bunch of times but always the same result. One time the stick showed up as a XBMC Radica Gamester Reflex in joy.cpl and I got some response from it, but the XBCD utility seemed the disconnect it when I ran it and I have never got it back again.
Sorry for all the questions, hoping someone has some bright ideas about getting things working a bit better. Is the source for XBCD up somewhere like github? Would be happy to add my VID/PID entries to the default inf.
Thanks!