
Hello, magic printer that gave me a job and fed me in the early 2010s.
If you work in an environment where you have to constantly ship physical goods out the door. Hell, if you've even visited the post office and had a clerk print you a label. You've probably seen a thermal label printer in your life. During the 2010s the job market was certainly turbulent times with many phone jobs getting moved overseas. And field repair being sourced to the lowest bidder instead of asking the question if it's even the RIGHT company/technician that can do such a job. A lot of carelessness resulted in us having to rethink our careers.
For the first article, where we take you on a crash course in thermal printer repair, click here.
For the second article, where we teach you out to use common raster programs for these printers - Click here for Adobe or here for GIMP.
Read into my diatribes for the revisit of this topic!
The real.
Being a printer technician is not a glorious job. If done correctly, it can be a consistent job. One where you know exactly how long it takes, and if anyone asks if you can do it faster.
No. - S
If you build up enough of a reputation, it can certainly get your foot in the door of a lot of companies that need help with their printing technology. During a time when the tech market was collapsing (first time! not now). We didn't stop at just working on thermal printers. We worked on a lot of old-school mechanical printers like the IBM-6400 hammer matrix printer. Pin printers like the Okidata ML320 were the only thing that broke down on it was the printhead itself from usage. To laser printers.
When you covered that wide of a market, there wasn't a need to rely on laptop/desktop repairs alone. Oh sure, we still did them. Especially when one of our customers gets pissed at Best Buys "Geek Squad," which down to the very name insults the repair industry, screwing their employees with terrible wages and being a place for tech colleges to drop off graduates so they can satisfy their 90 percent placement quota, not factoring in that most leave within a few months. Irrelevant, they were placed by the college in a 'career'. Mission complete to those fucks at universities. Even the Apple store, from time to time, we took the Louis Rossman path of life. Apple charges $600 for the LCD, along with not really understanding that on some MacBooks, the very LCD was also sold on Dell laptops for $70. Crazy times.
To those who work at a Geek Squad, sorry to be so harsh, but there are better places that will pay you better than a 7-cent raise per year! Such as going into business for yourself!
We've since moved on to more industrial ventures. But this article is almost like a revisit.
 IP address blurred to protect the guilty.
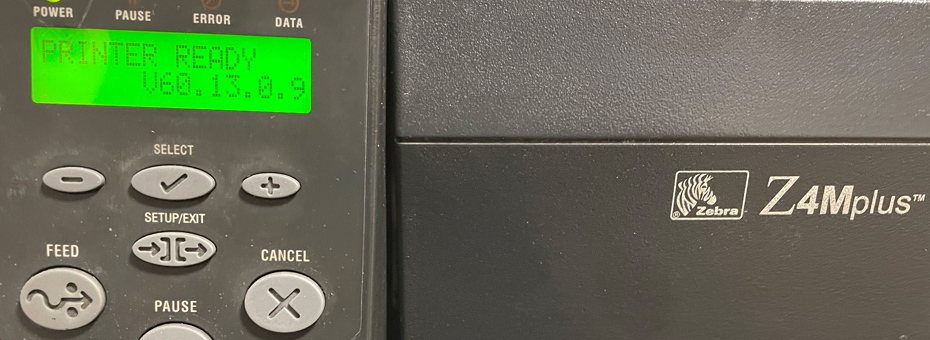
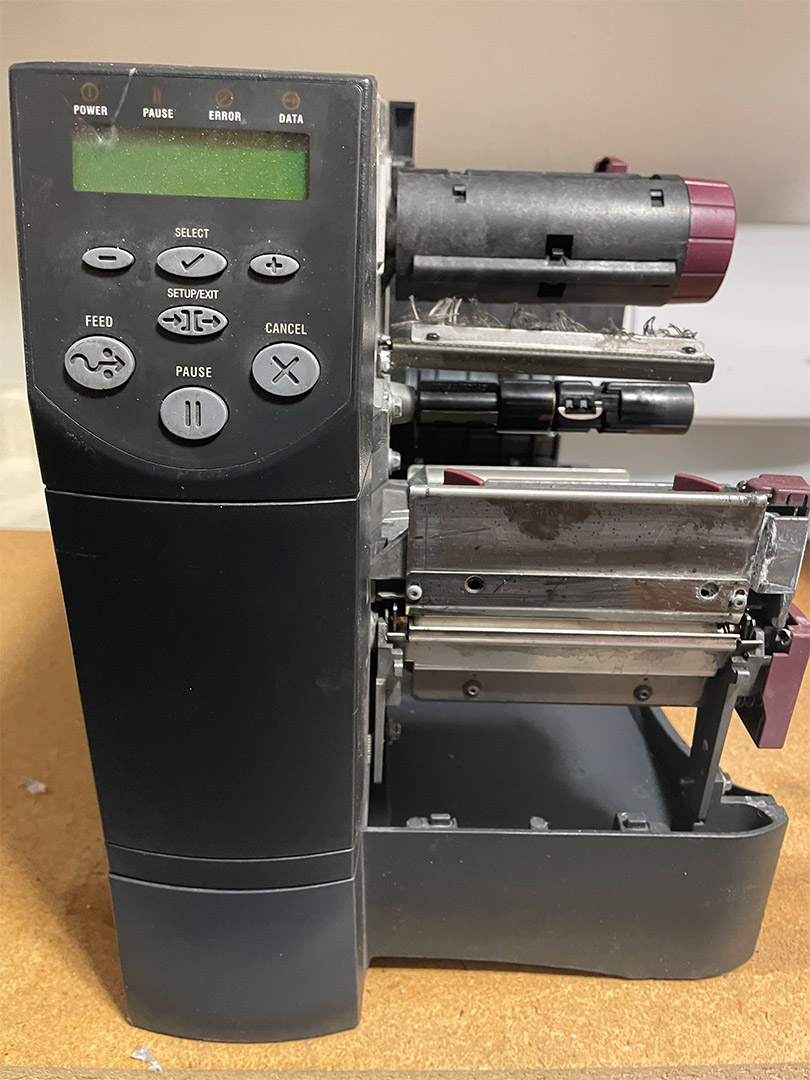
Thermal printer get!
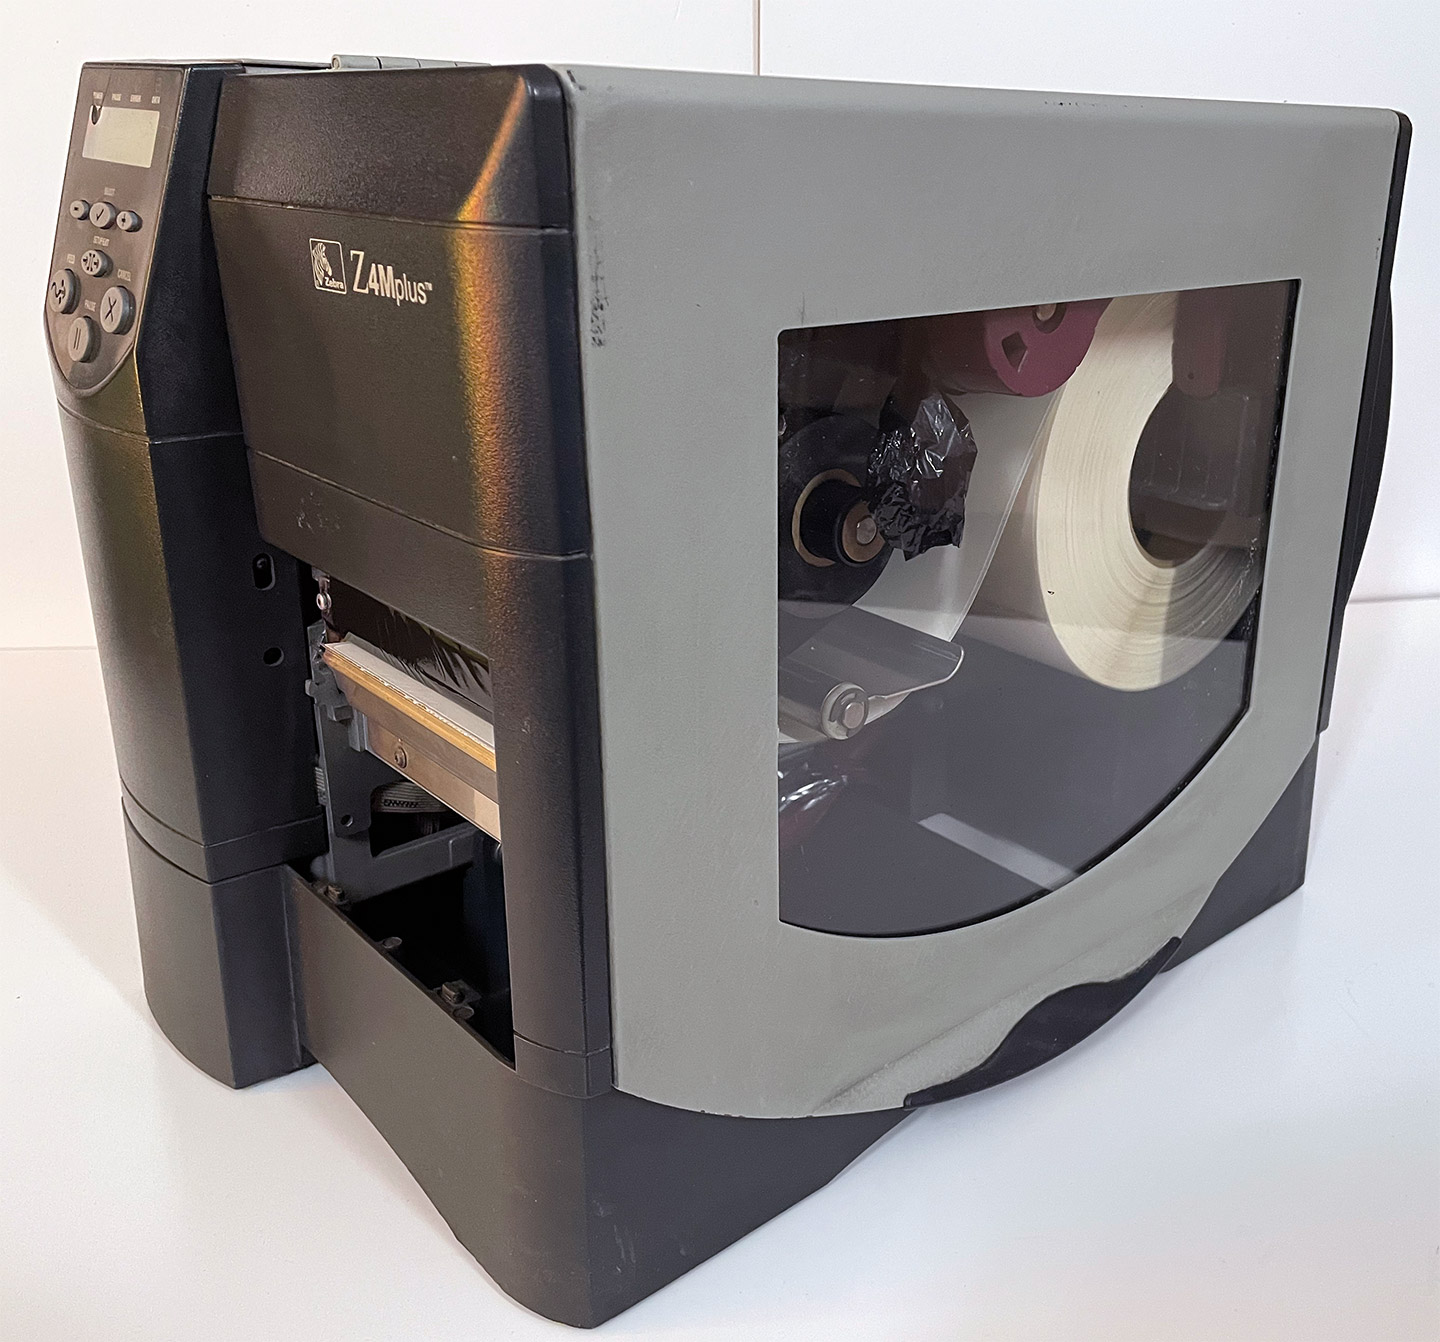
The picture above is a Zebra Z4m+ 2000 series that obviously has been through a war over its 20+ years of existence. Although not the most destroyed printer we've seen. All of that dirt and grime, and on top of us, blurring out the background and IP address of the printer. This was the highest resolution picture that they posted on the site. Despite all of this. We can see at least a few things.
- It powered up! Some Z4m original motherboards were prone to failure, and this would get all the lights and nothing on the screen when you powered it up (EEPROM/CPU failure).
- The test label looks SOMEWHAT intact.
- No plastic door near the bottom of it, but that's just cosmetic.
Oooooookay. Their asking price for this printer was $25+shipping (they were in the Midwest US close to me, thus.. $20). $45 for a questionable machine.
I'm in.
Why?
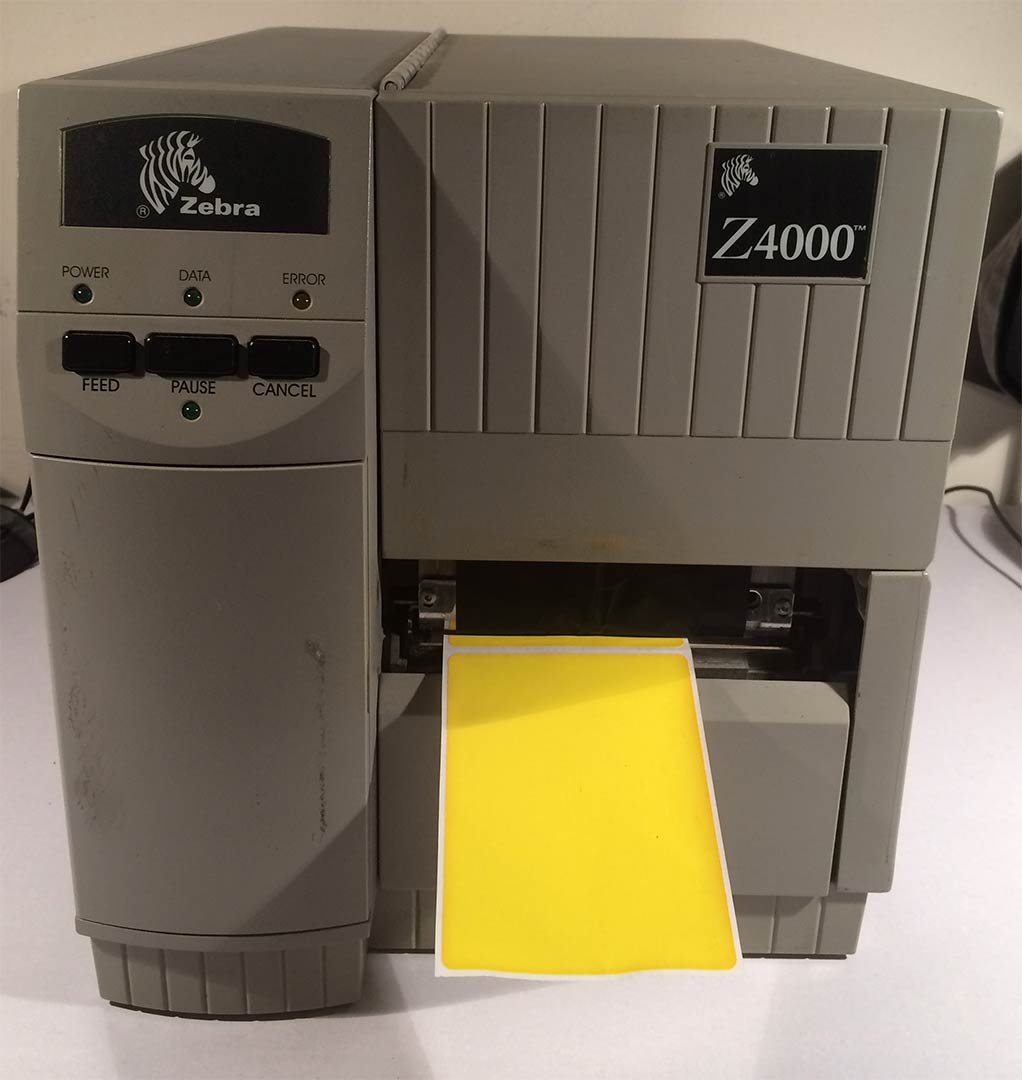
Because even if the head was toast. Even if the platens were wrecked. Even if the timing belt was fucked. It's an upgrade from my current Z4000, which, even though it prints flawlessly, having idiot lights for status versus a legit LCD would be a massive upgrade. And yes, I know I could get an LCD system for the Z4000, but those were rare for the Z4000, and they generally wanted $125 for just that upgrade part alone.
Chemicals!
I didn't take many pictures of cleaning the printer. But I can go through my top three chemicals that we used for this entire process.
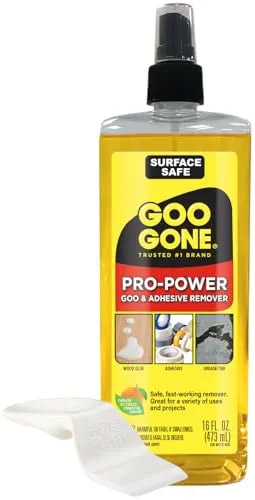
GooGone Adhesive Remover.
Fairly self-evident what it does, given how it's common to receive a used/beat-up printer from some warehouse with a bunch of its labels slapped all over the damn thing.
For the labels, I generally would pour it onto the surface. Wait 30 minutes for the citrus oil to penetrate the label. That I'd start with a rag at first. But if that was not cutting it I may break out a scrubbing pad to remove the final adhesive.
You can get this stuff at hardware stores, and sometimes grocery stores have it in a specific aisle.
Yeah yeah, we are very well aware of how risky it is to use this instead of 70-80 percent isopropyl Alcohol. But this stuff was used heavily when we were cell-phone technicians because we didn't give a shit about serial number stickers on the circuit board. We were trying to fight/clean corrosion off the circuit board. This stuff does the job. You could dunk an entire motherboard in this stuff. toothbrush everything clean. Because of how fast everything evaporates, you could potentially power it up in an hour.
I've tried 409, Stoner plastic cleaner, and covering the whole thing in GooGone. But the kind of Dirt that exists in an industrial-grade warehouse is not your typical smoker's dust. It's diesel exhaust from the semis. Forklift exhaust dust. Pitch black dust that penetrates everything. The backrooms of airports suffer from this the most. Then, this stuff gets intermixed with the HVAC system. Brutal shit. Then, as a collective society, we scratch our heads, wondering, "How did this man who never smoked get lung cancer in a warehouse of all places?"
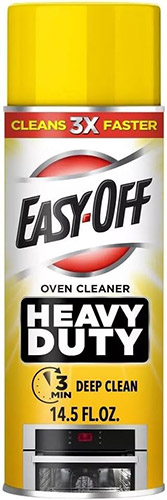
The only thing I found that works is that you treat it like the printer/computer was spray-painted/tagged by a street gang. Which is to use oven cleaner. The nice thing with oven cleaner is that it can clean without destroying ABS plastic, which the front and back of the zebra printer are made from. The insides are powder-coated metal, which is no problem either.
There are just two things to keep in mind when working with a cleaner this abrasive.
- Wear gloves. You don't want something this caustic on your hands. It's not fun.
- Any screen-printed graphics, like the logo on the front of the printer, should be avoided at all costs. Oven cleaner WILL remove the silkscreen graphics. Which, if that is your intention. Like, taking an old Dell keyboard and spraying oven cleaner along the entire surface, then, in three minutes, wiping it down. Congratulations, you would have made your very own bootleg "Das Keyboard" where there are no letters. Also, handy if you want to deface a PC case of a company you don't wish to support. (and yes, I know the newer Das Keyboards are mechanical. The original was not. It was just a membrane keyboard with blank keys).
Dissassembly.
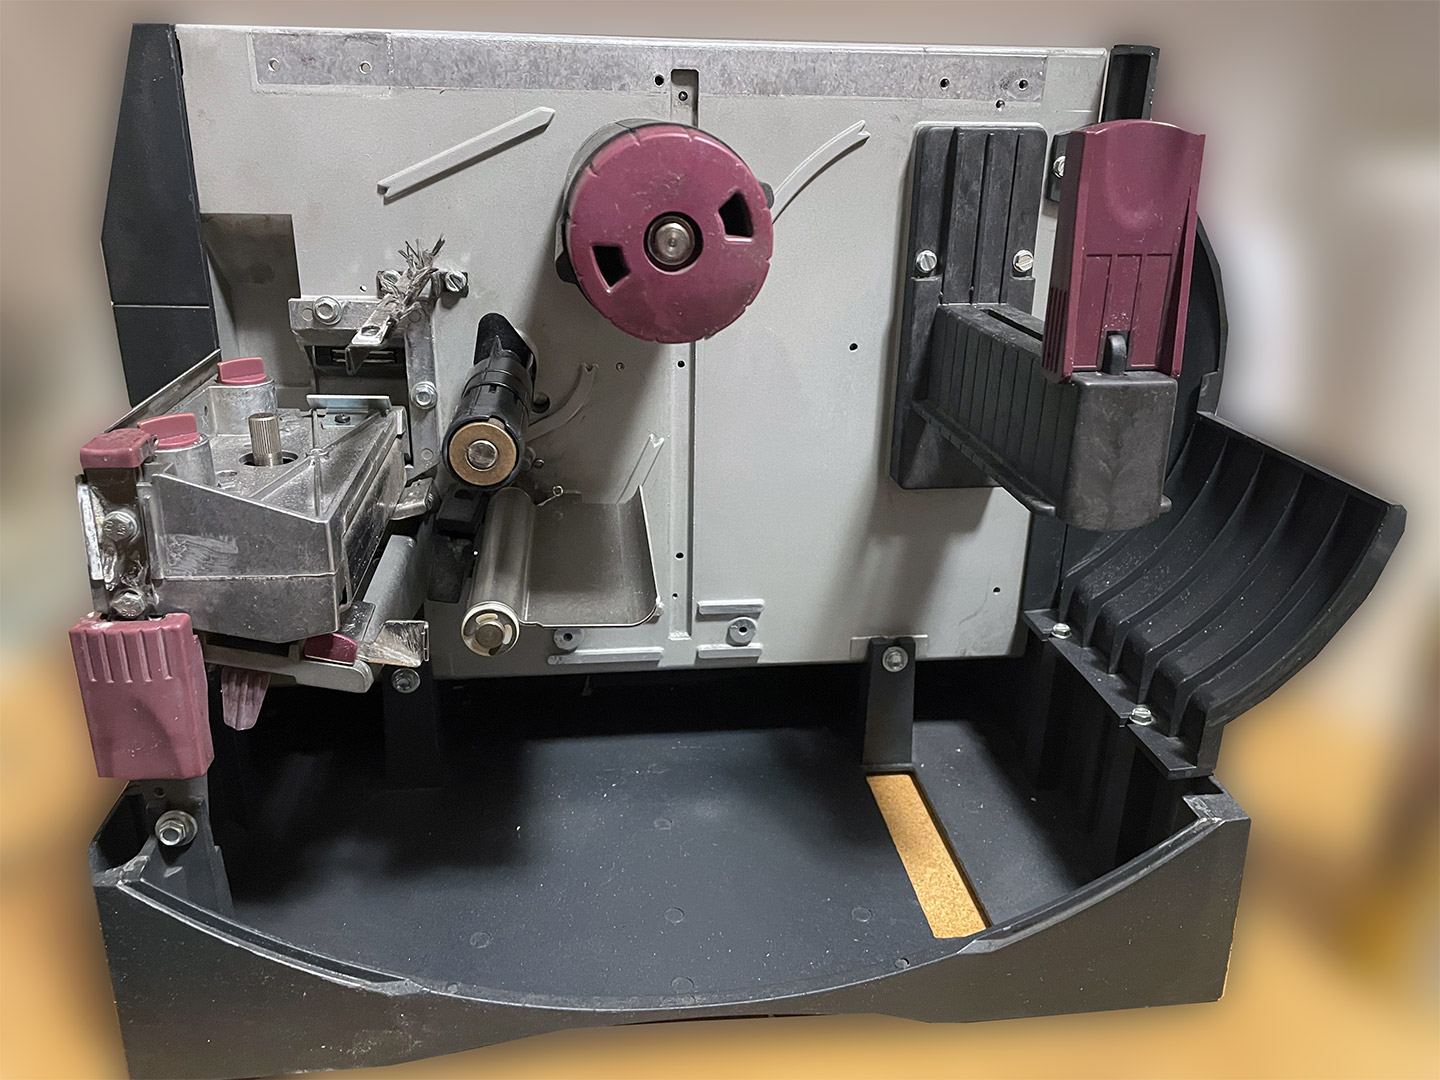
Just like handling sleeper PCs. It's a good idea that the moment you receive one of these that you take it apart right away and start cleaning. There are plenty of places for terrible things to hide, especially for a printer of this size. We've already hit this with our cleaners rather hard (a little TOO hard, as there's some white residue in places that we'll have to clean up later).
I will give Zebra credit on this printer for making these commercial-grade printers highly accessible, as we didn't even need to remove the door like we did in this picture. It's just one screw, and the electronics area pops right off.
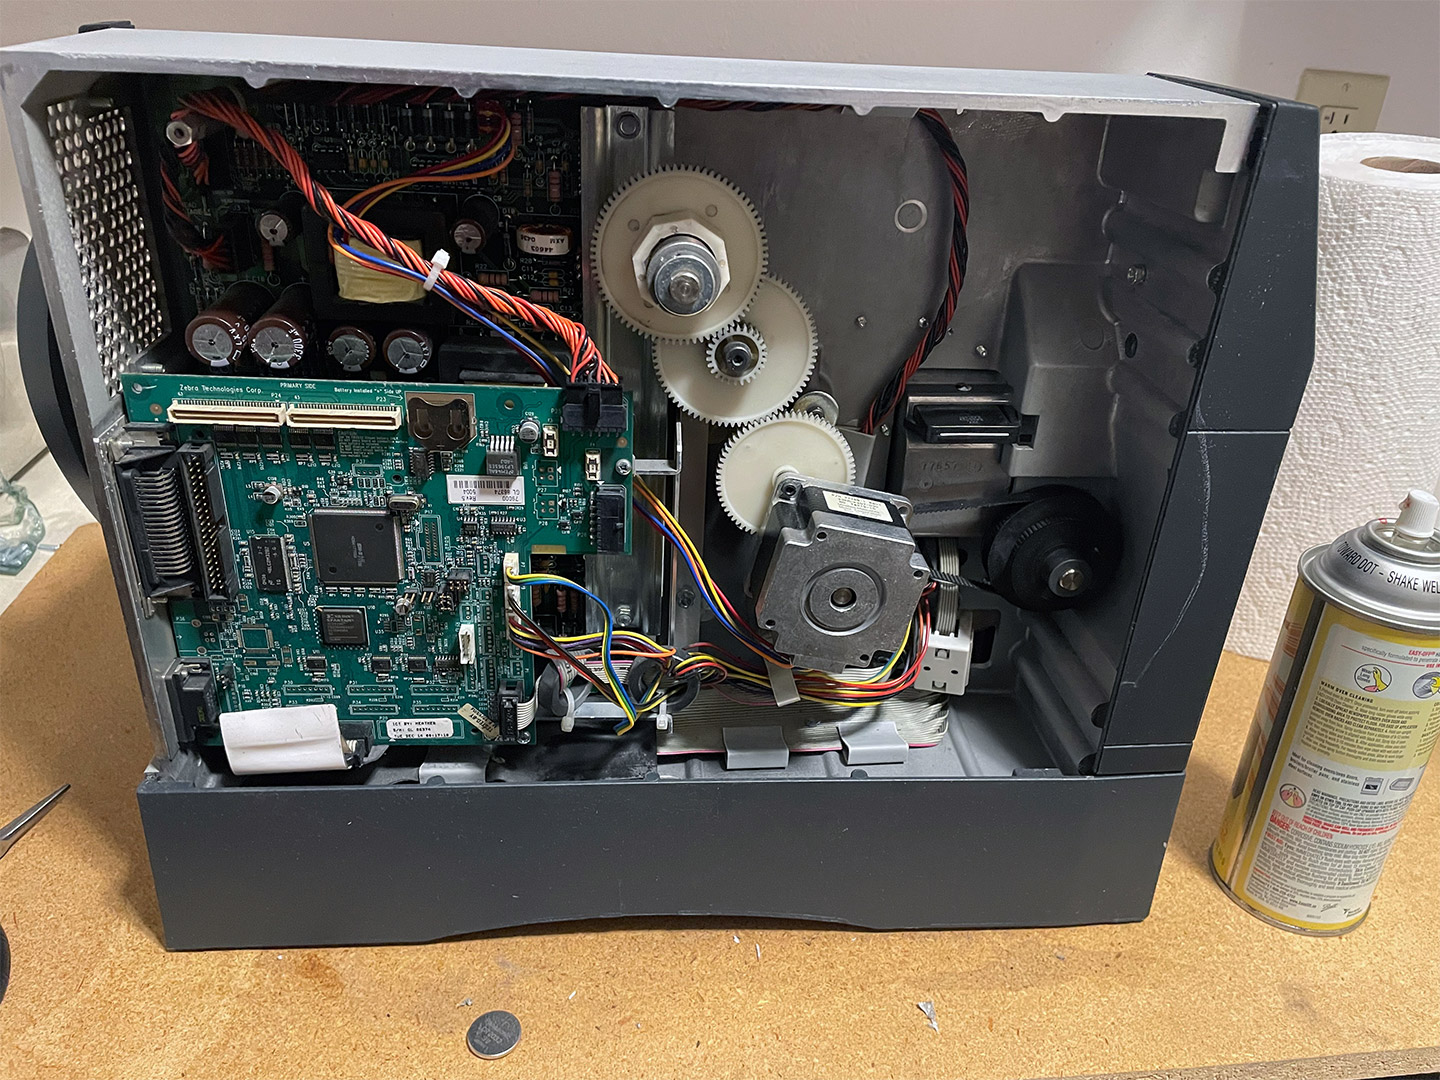
The electronics side didn't get as dirty as the mechanical side. Possibly because this side cannot be as easily opened for dust to really get in there. However, we gave it the same treatment. But alcohol on the circuit boards. Oven cleaner on everything else, like the gears and frame. Then at the very end, I throw in just a touch of lithium grease (size of a Q-tip, really) to quiet the gear,s as sometimes the first gear next to the stepper motor can get chewed up over the years.
There are some things to check that I've covered in our previous blog, like the black timing belt going to the printhead platen. But some NEW things to keep in mind is that there's a 3.0vdc lithium coin battery that never-ever gets checked through the lifetime of the unit. This is because these models of Zebras actually kept time, and you could send a ZPL down to them to print the date and time right on your label instead of letting your computer/ERP system worry about that. Now that we're pushing 20+ years, it's a good idea to get that bad boy replaced.
Oh, in case you're wondering what that 40-pin IDE connector goes to. That's where you have a network card that hijacks your parallel port. As for the white expansion slots above I want to say that Zebra did something similar to the Z4000, where you could add static RAM so you can store images and recall jobs. But for the life of us, we can't find that kind of expansion card for the Z4M+ anymore.
Printhead and platen/pressure roller inspection.
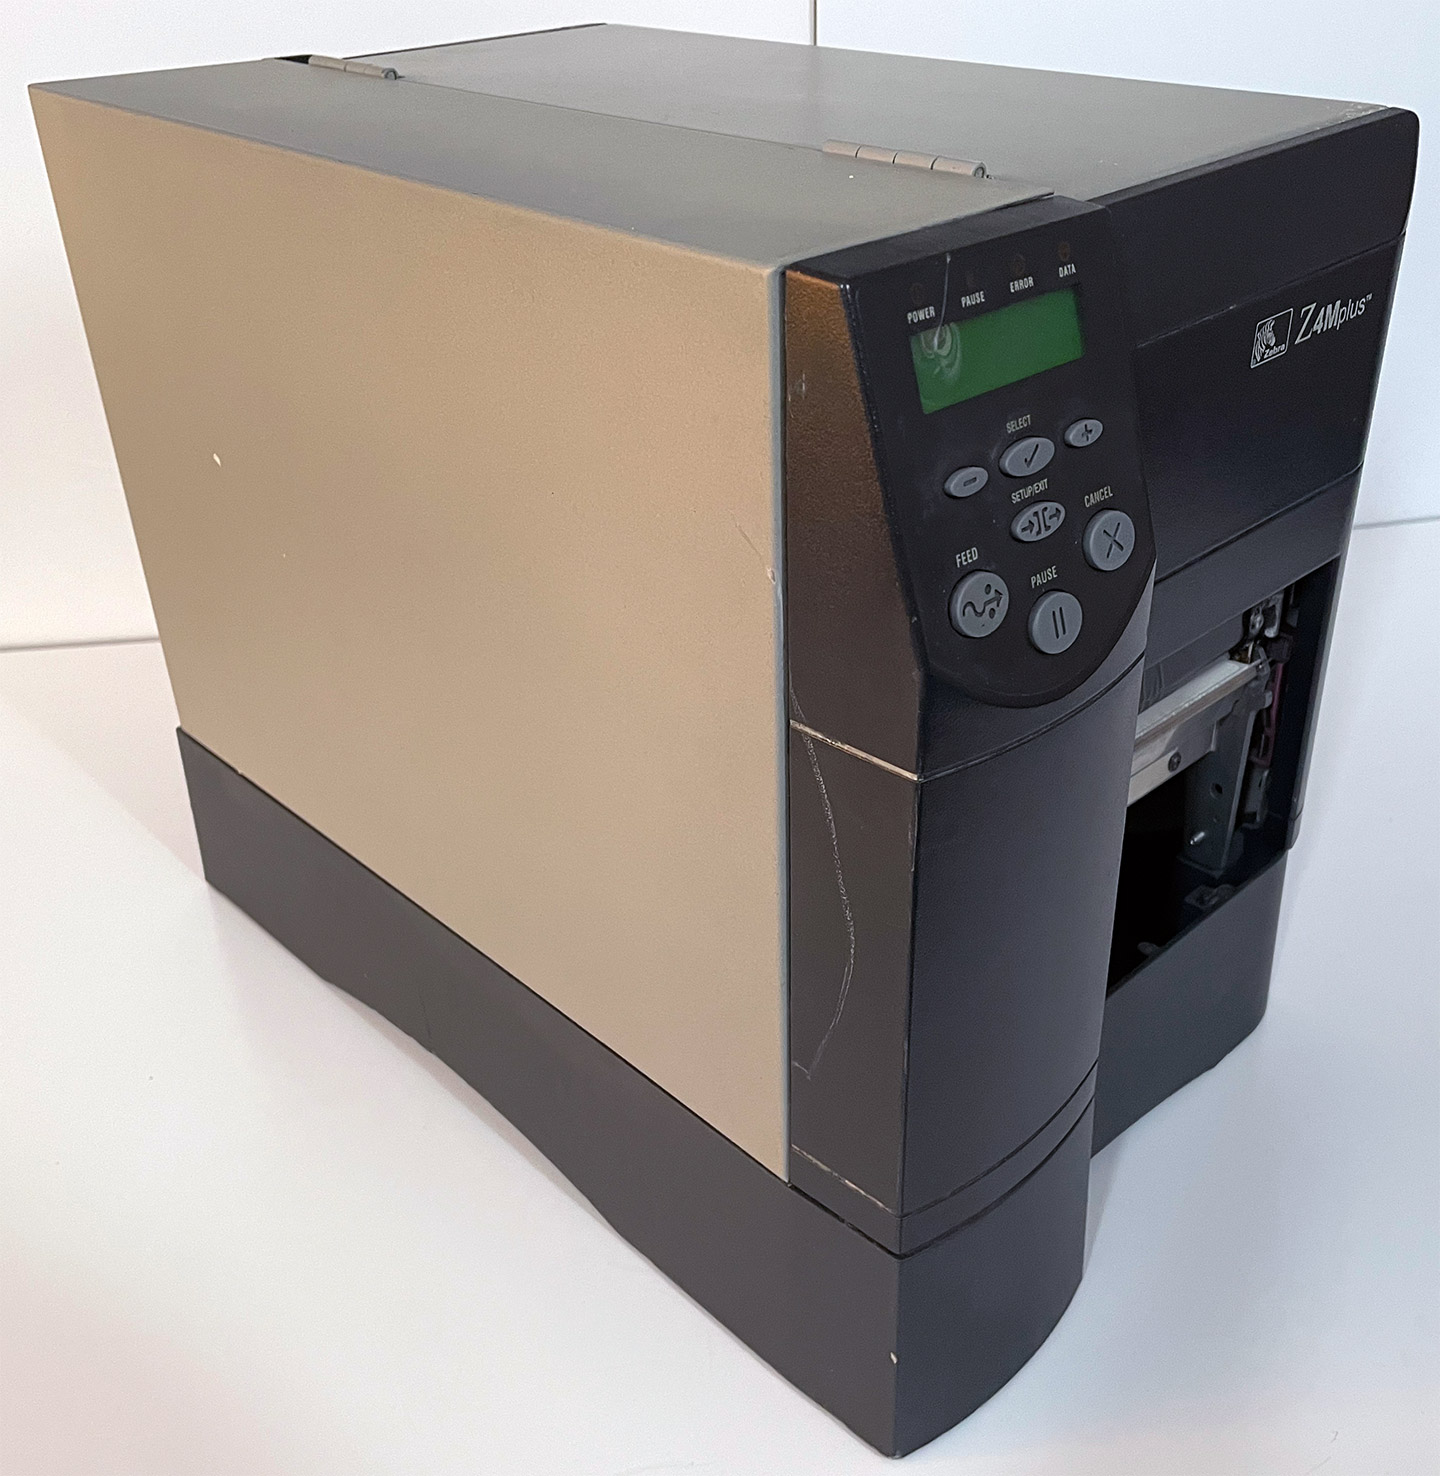
That front panel got hit rather hard. But the LCD still works. Since you can't get the polycarbonate sticker all by itself, if we were to refurbish this for someone else, we can probably get a replacement control panel for about $40.
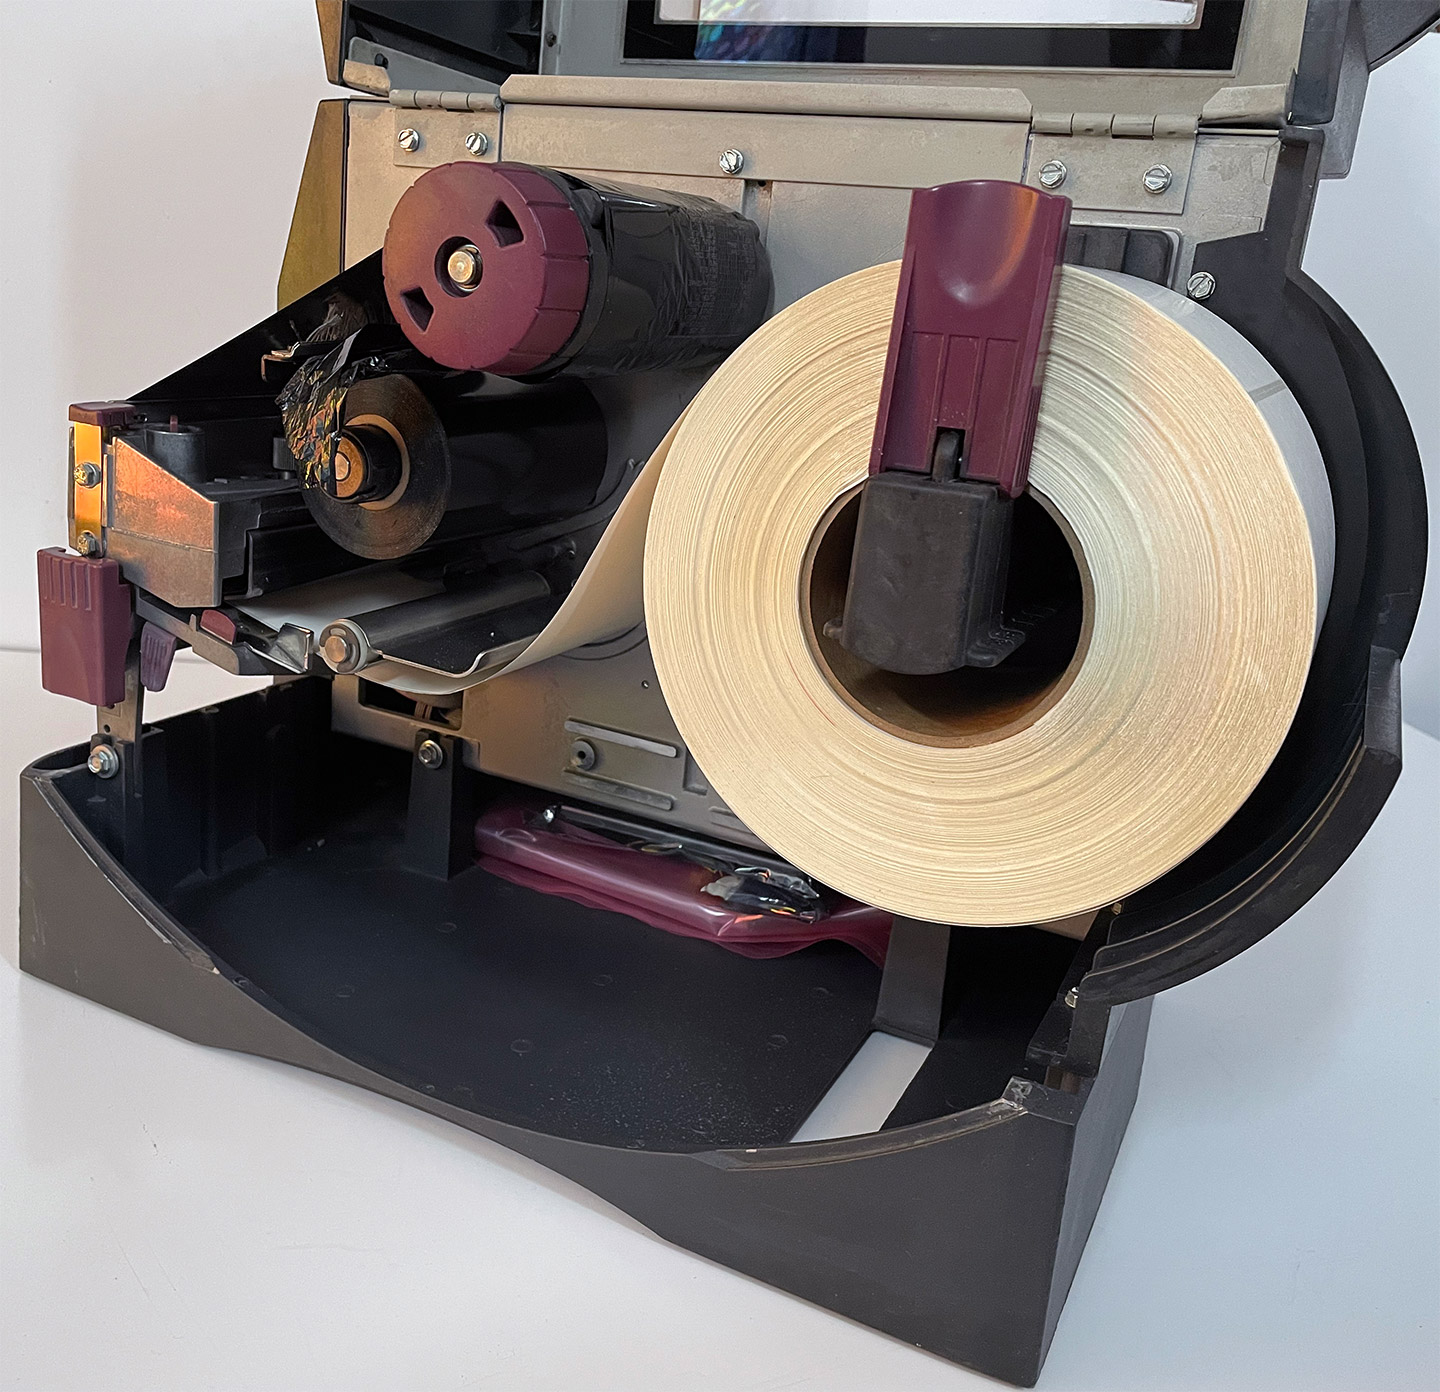
But that's not where we're going today. Instead, we're going to pop open the print head with those purple latches and pull out the platen and the printhead.
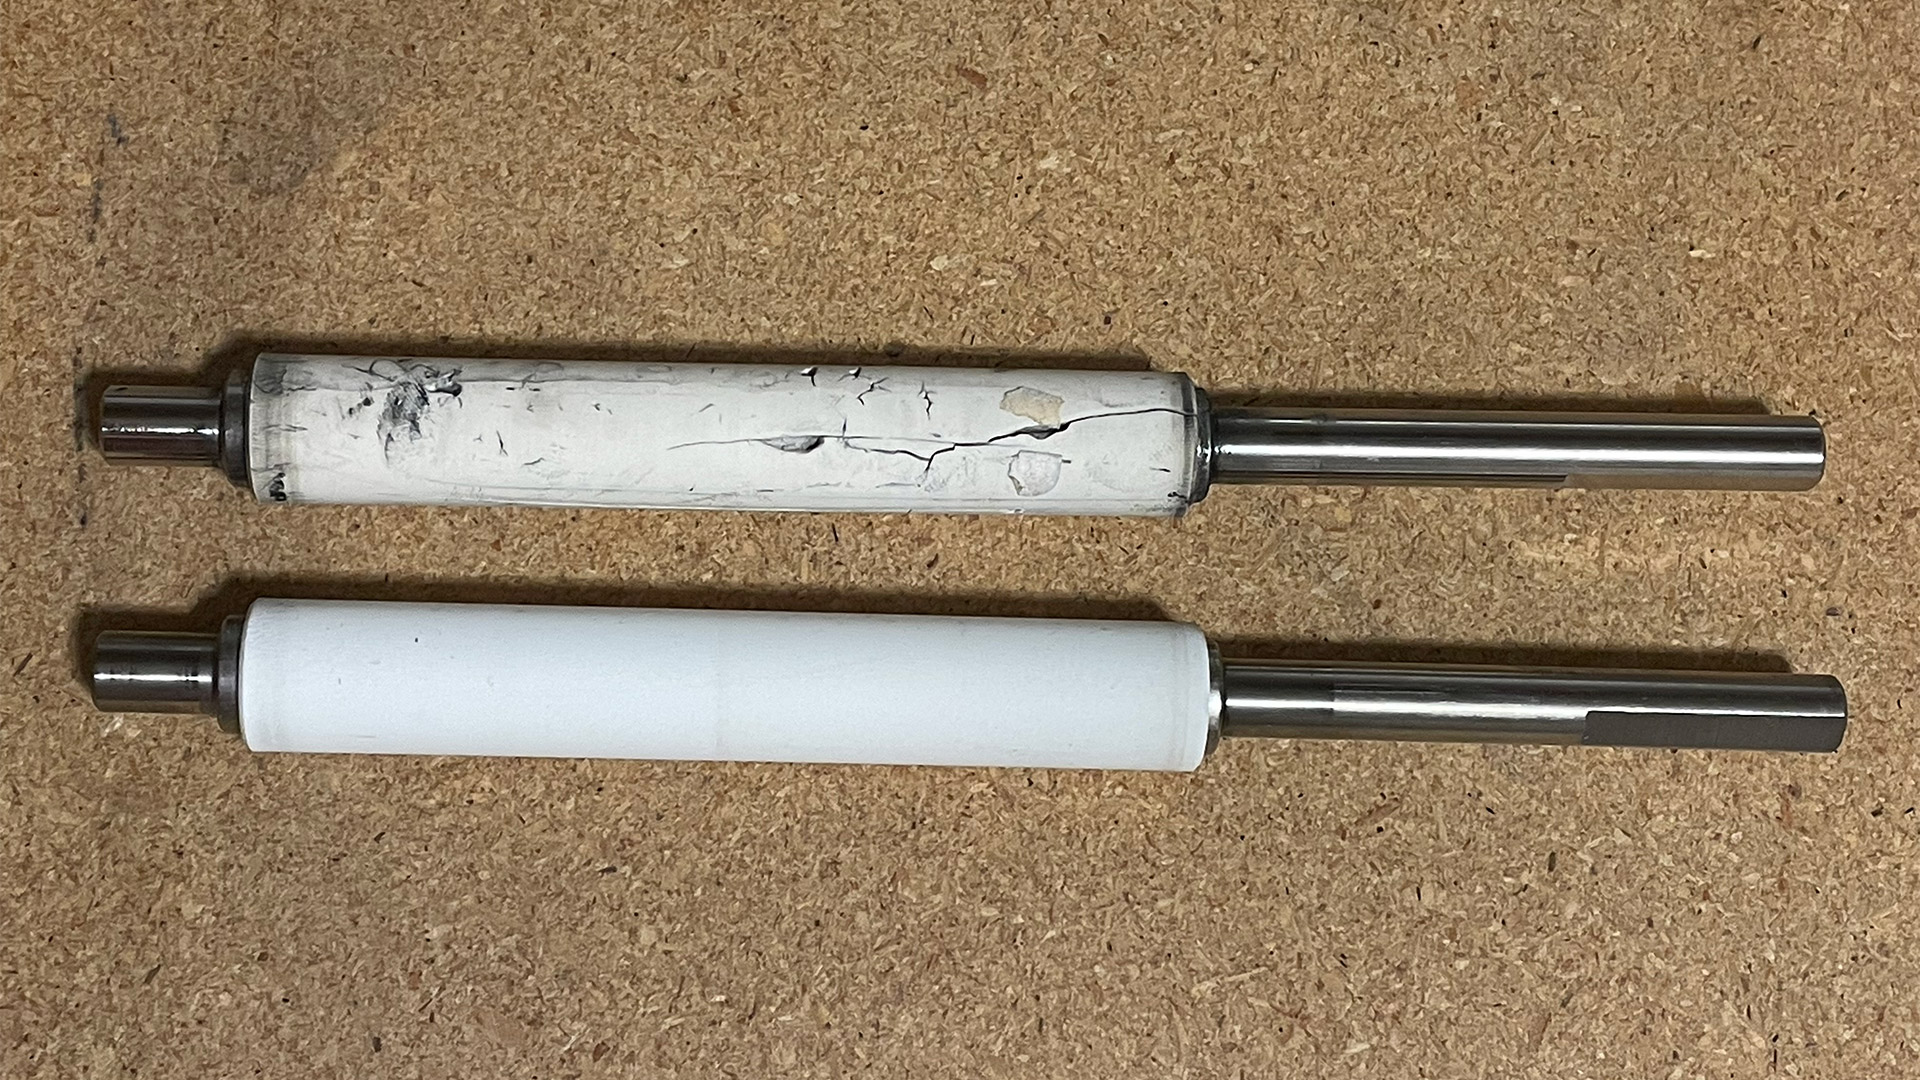 Platen from the Z4m+ auction printer above. Z4000 platen from our printer below.
Holy hell. That platen damage.
For those first-time visitors to my site who didn't check out the first article. This part of a thermal printer is one of the most important parts of printing, which is the platen roller(sometimes referred to as a pressure roller). It's responsible for pressing your labels evenly into the printhead so that it can fire wax or direct thermal down to the media.
This is usually caused when someone in the company decides to tear a thermal label off the wrong way. Taking too much of the wax underside. What happens then is that on the next label, the sticker part binds to this platen roller and wraps around it. Eventually, it jammed the whole thing up. You're not supposed to use a knife on the platen. However, when you need to get shipments out within the hour, or else all hell would break loose. You also don't have the time to be taking apart the printer to do it the right way either.
The good news is that this is generally one of the cheaper parts of a thermal printer to replace. (Around 10-30 USD). On the Z4m+ you have two metal clips that have to be extracted (remove the printhead first before doing this), and then you have to undo the black gear on the other side of the Zebra. Then push the brass bushing back and forth to extract. Really fucking annoying process.
Zebra has made this process a lot simpler on their smaller shipping printers, like the GK420 where it's just two plastic clips you can remove by hand. Because Zebra was aware that sometimes you need to remove this platen to clear the label. Or else stupid things like people pulling out a knife would occur! This was more of a design issue with Zebra, as they didn't devise a trap door or anything to assist with cleaning the platen.
 Now that everything is out. There's MORE to remove! That's right! Stickers can sometimes build up underneath the platen/pressure roller and cause it to build up friction, which eventually makes your timing belt skip or break. Also, if there were any slashes in the roller, these extra labels underneath would keep pushing against it, causing the chunks to fall out.
With all of this fun stuff taken care of. Let's look at the printhead that came with this printer.
Onward to the printhead.
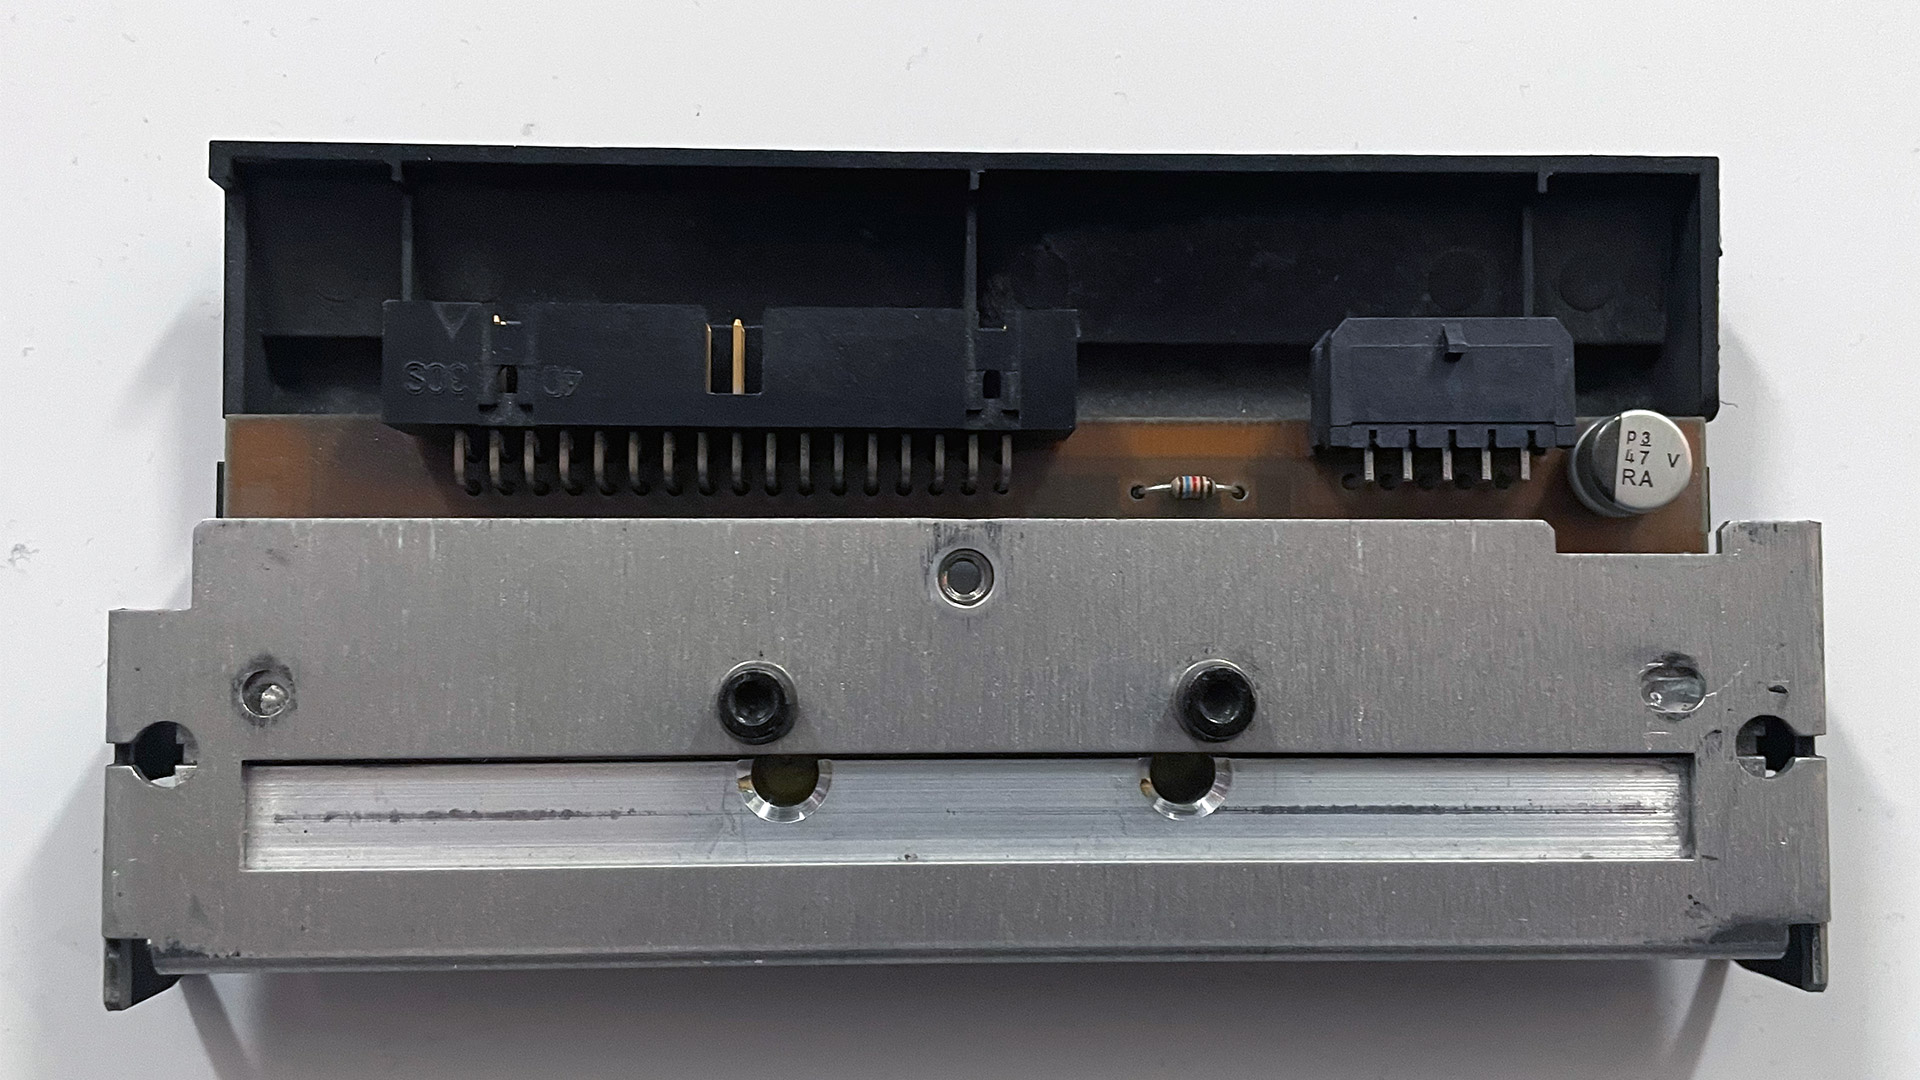
Removing the printhead is the total opposite of removing the platen / Pressure Roller. It's easy! One thumb screw at the top of the printer where the head is held. Then two connectors, and it pops right out! This is in part due to Zebra knowing that they may not be able to control the media you use. If you use it traditionally with a Wax Ribbon and quality media. The printhead should last for millions of prints. But if you skip the wax roller, purchase direct thermal labels, and they have the consistency of sandpaper due to the low-quality press they may have used, as the company is trying to save a buck as well. Yeah, you're going to eat printheads like candy.
Printheads are probably the most expensive part of the thermal printer. They're unserviceable because everything instead of the head is sealed with resin. In many cases, you will see a Z4M+ on eBay cost under $100 because the printhead alone is $100-200 USD.
If we were to describe the quality of the printhead. It's a 4 out of 10.
It's certainly usable. But as you can see by the 'white' where the resin is rubbed right off, and the little dot of white on the other side. This head is certainly used but if we were running production like shipping labels. The head is still very much usable. We don't have any white areas in the middle of the head, which would cause streaks and fuck up barcodes.
This white damage is generally caused by the edges of the label acting like sandpaper, wearing down the printhead in just those regions. In general, these areas are non-printed, which means no one will notice this damage right away.
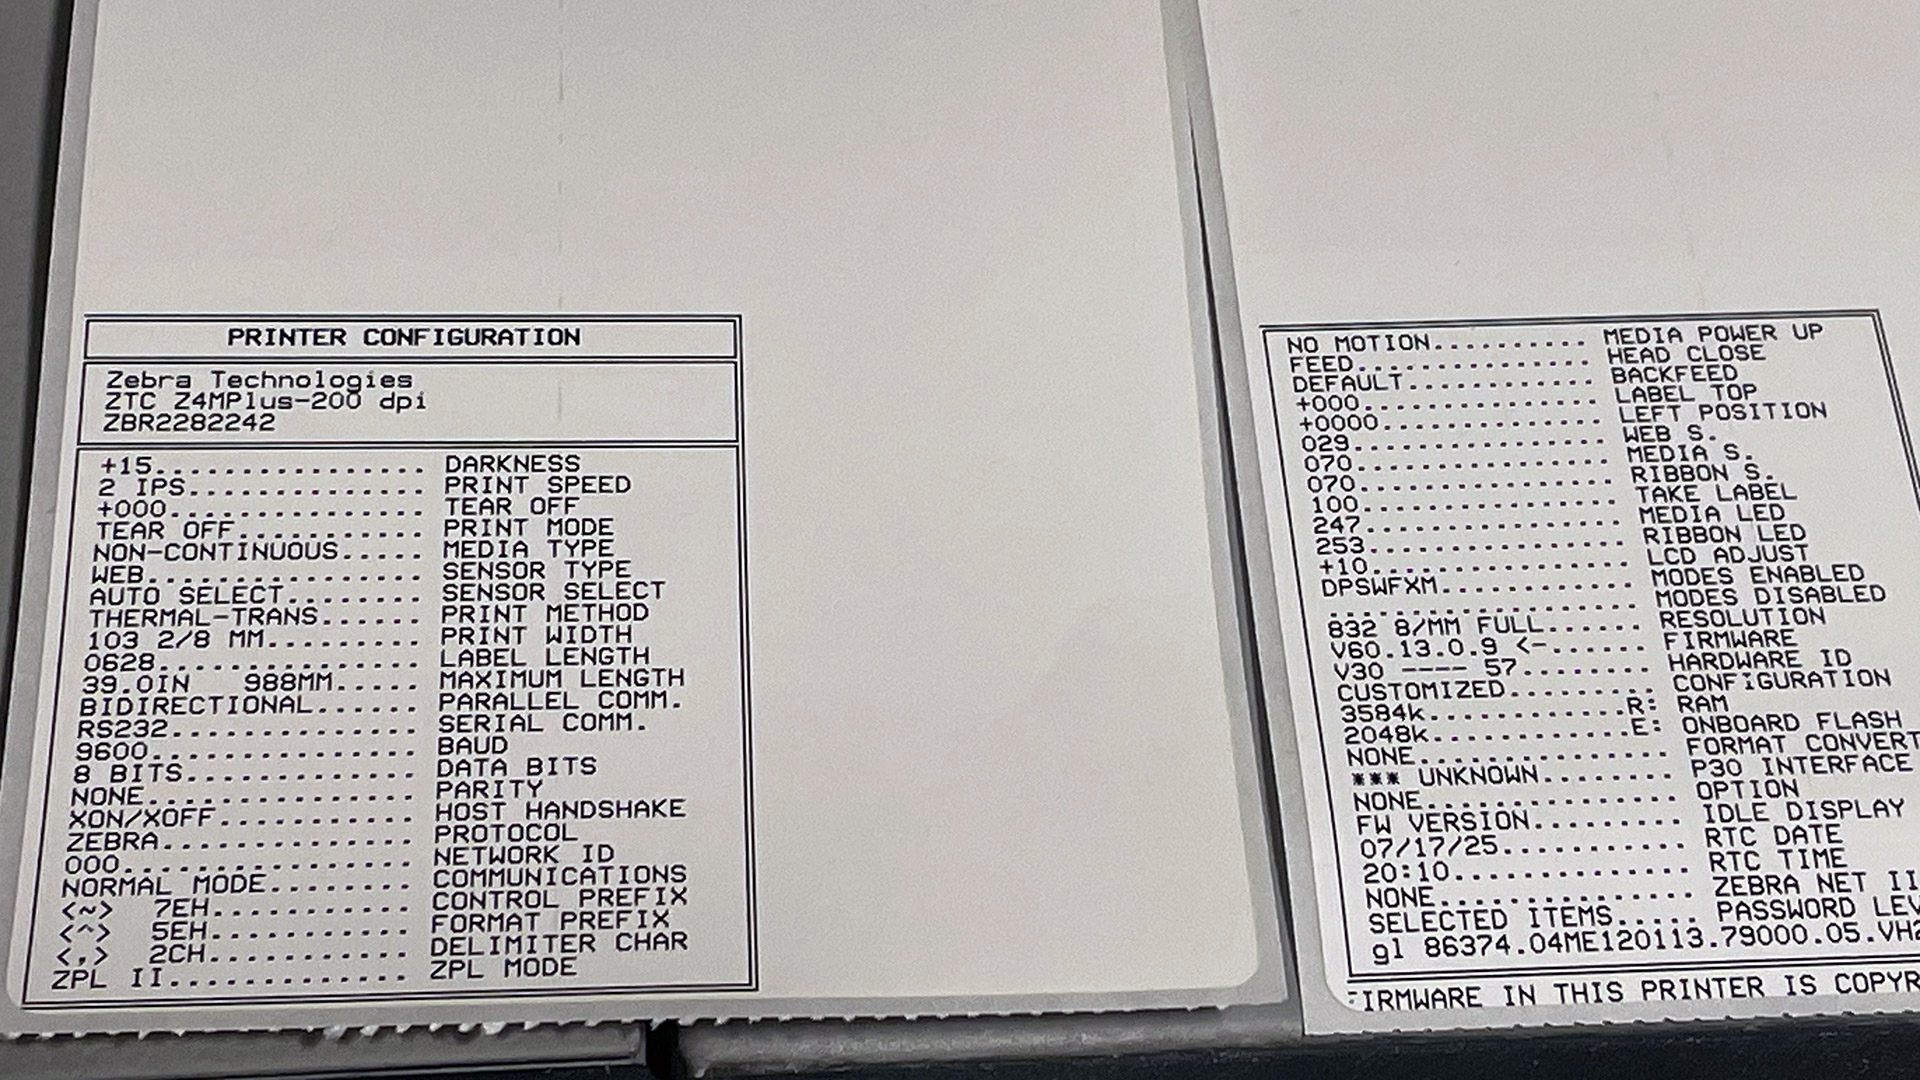
Although, unfortunately, the zebra test print does not cover the entire label. It does show the damage of that printhead on this print, where the "F" in FIRMWARE is gone, as well as the double lines on the left-hand side are missing.
If you were a customer printing the edge of your media, you could adjust the printer's settings to add a slight offset to your labels, thereby maximizing the usage of your printhead. Again, if you were doing UPS, USPS, FedEx, or DHL labels. You don't even need to use the offset function as many of those companies have a habit of putting enough of a margin in the barcodes, where this would be, for the most part, unaffected.
Print density is rather solid on this as well. Keep in mind that if it gets too dark, you won't be able to scan your labels. In this case, we would probably bring the density down to +10.
ZPL print language versus DPI of the printhead.
Now, we COULD transfer our 300DPI printhead from our Z4000 over. And in our tutorials on using Photoshop and GIMP. Upgrading to a 300dpi printhead would be better overall. In a personal environment, that is great!
But as we work in industrial places now. The needs have changed a bit.
Companies tend to use Zebra language, known as ZPL, to communicate with their printer. In the mid-90s, the concept of sending a 300dpi raster was too memory-intensive and heavy for the computers of their time, when people had 4-8-16 megabytes of RAM. Not Gigs like we have today!
On top of this. The data that shipping and stock labels were coming from were not graphical machines. They were AS/400, AIX, DEC VAX, IBM System 32. Ancient machines that only have a dumb terminal hooked up via a 9600 baud connection, only if you were super lucky. Or! You had to "dial in" to the corporate system via modem. These mainframes didn't give a shit about barcodes. But what could be done is that the database designers could inject code before the data to tell the Zebra "This is a barcode" and "This is the X/Y position on the label". You could even store a black and white BASE64 encoded binary on the mainframe and have it blast that out to the Zebra for your company logo. The total was 1-10KB in size, which over a 9600 baud modem could be transmitted in a second or two. Not bad for 90s tech, as doing a shipping label on something like a 9 or 24-pin printer would take 10-15 seconds for the heads to move back and forth to complete a UPS label.
So, the ZPL language was actually great because it allowed low input of data to produce graphical labels. The downside of this programming language is that X/Y coordinates are absolute. Meaning if you wanted text 2 inches inwards on your label, you type in 400. Thus, if you change the DPI of your printhead. You mess up your entire label configuration.
Old stock printhead get?
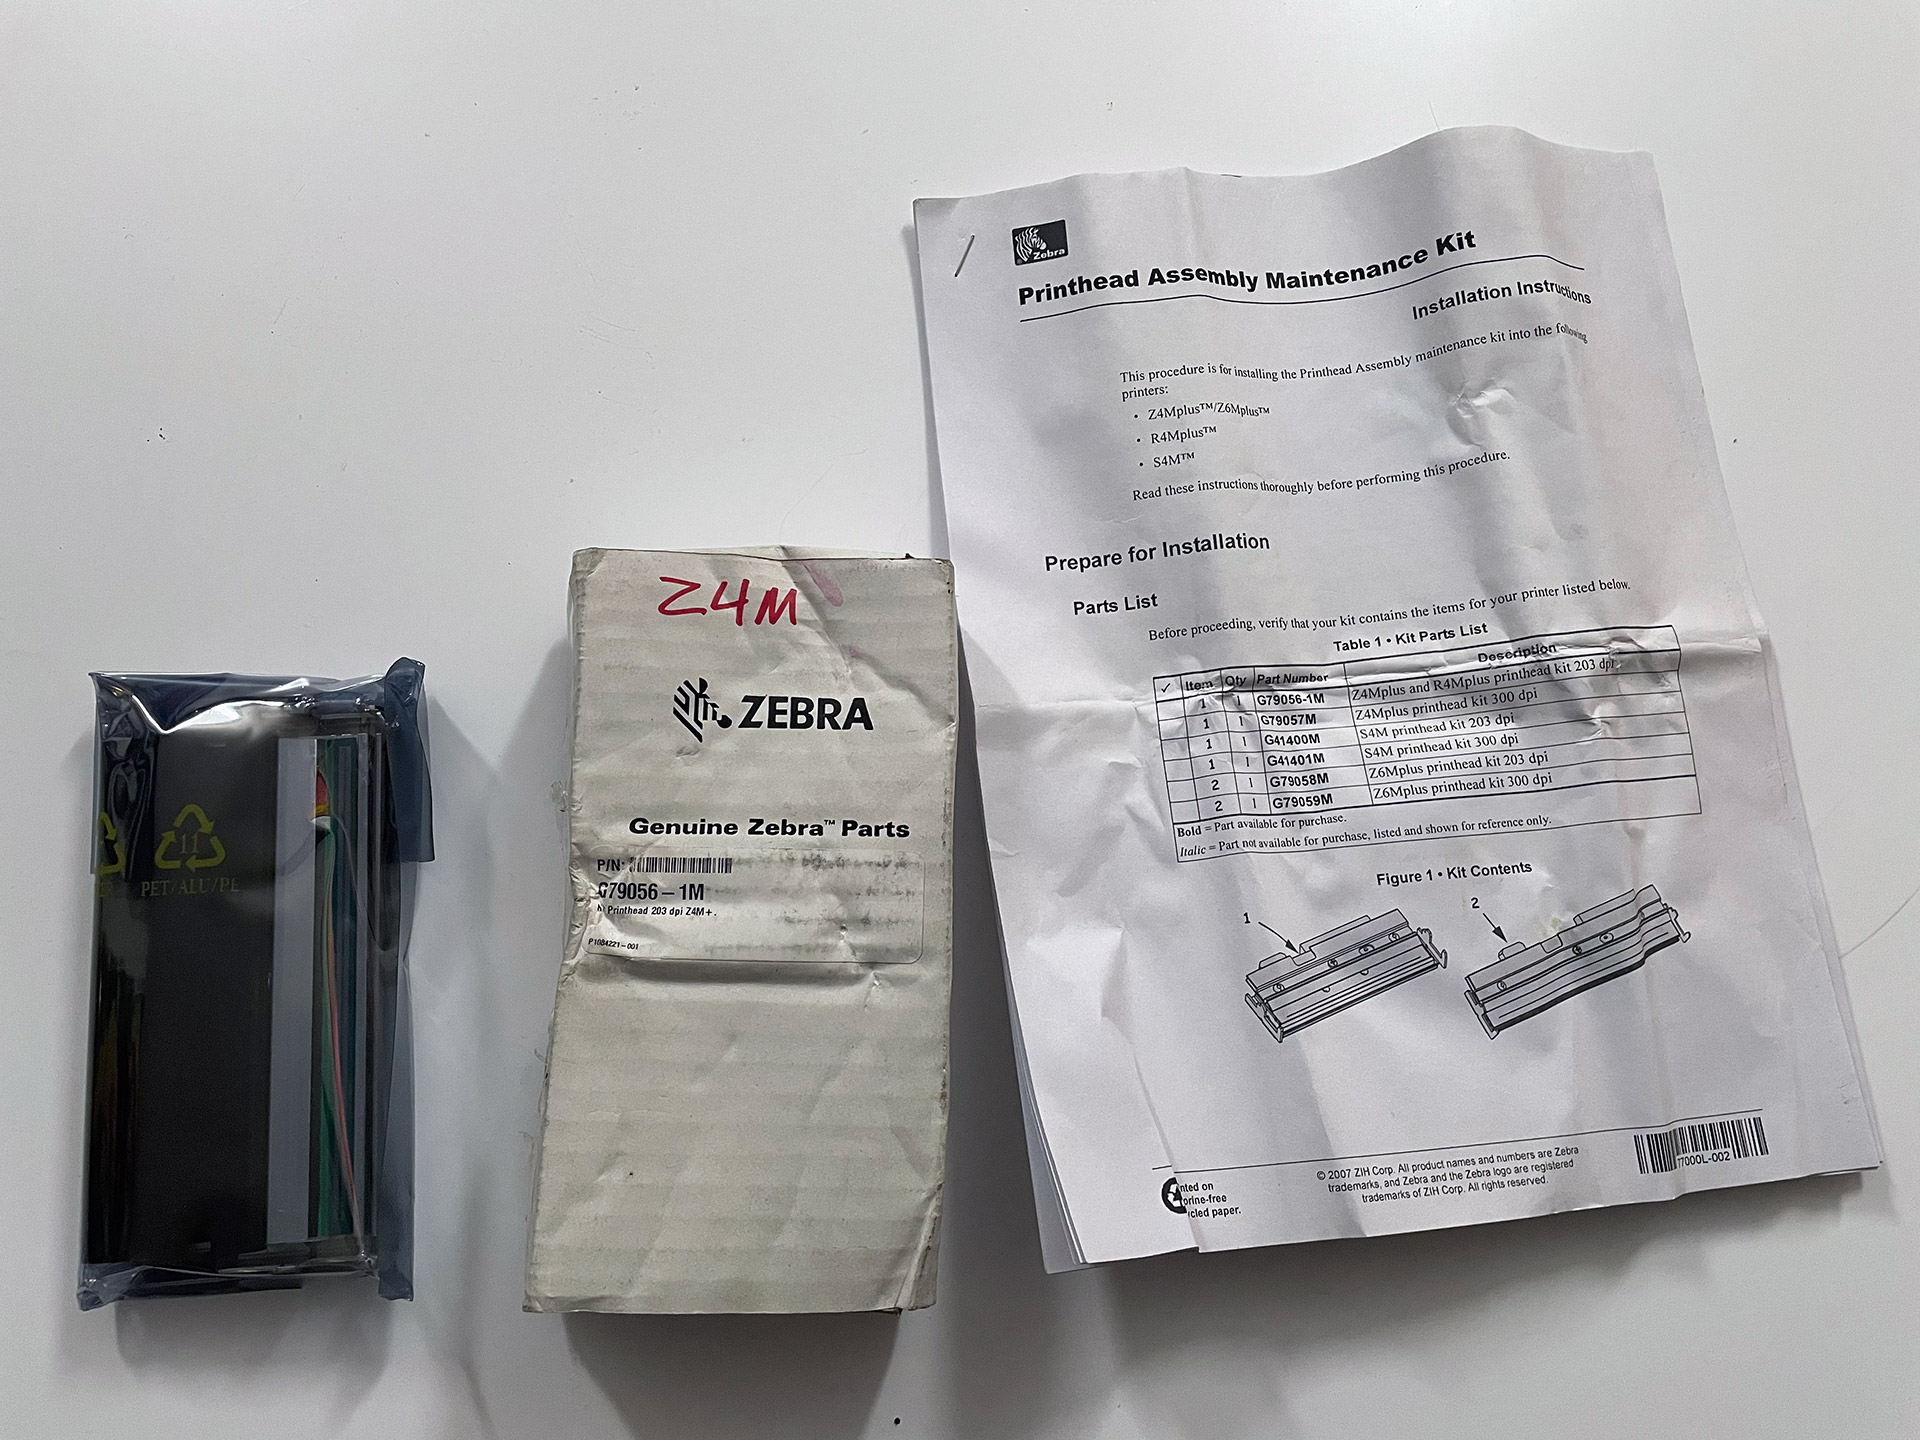
As mentioned before. Getting a new printhead is expensive. Zebra discontinued the Z4M+ as of 2014. The only vendors you will find are 3rd-party printhead production companies, whose God knows how long those really last.
However! Every once and a great while, on eBay, you'll get a closeout warehouse or estate sale that has an extra head like the one above. Where a company purchased an extra printhead but never got around to using it before their doors closed.
This particular vendor took the head out of the bag to take a picture of the underside to show people that there is no wear on it (honestly, we would do the same. Sometimes people put old heads into maintenance kits without writing 'used' on the box). Then, set a price of $10 for free shipping.
You know. For $10 USD.. We'll take a chance. And was super glad we did, as it usually does not work out. Even though the box looks crushed as fuck.
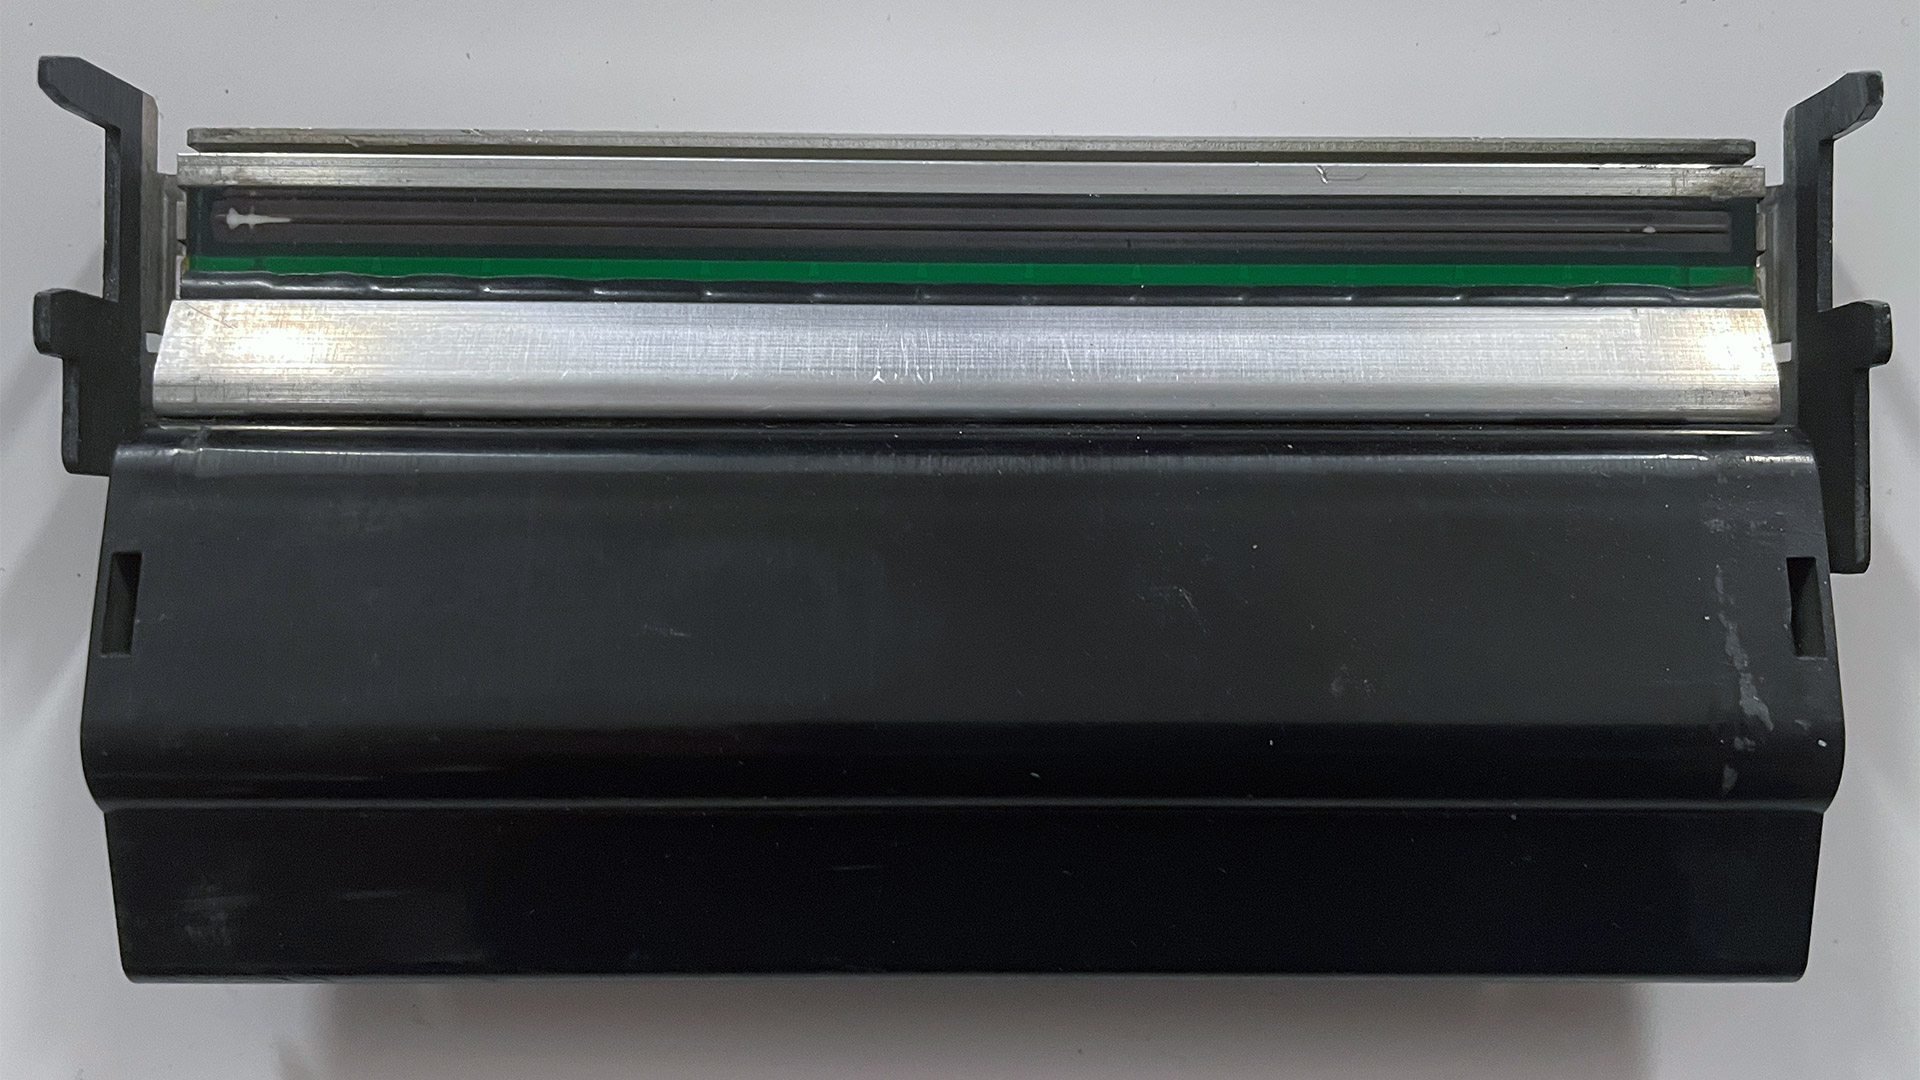
 Top Side.
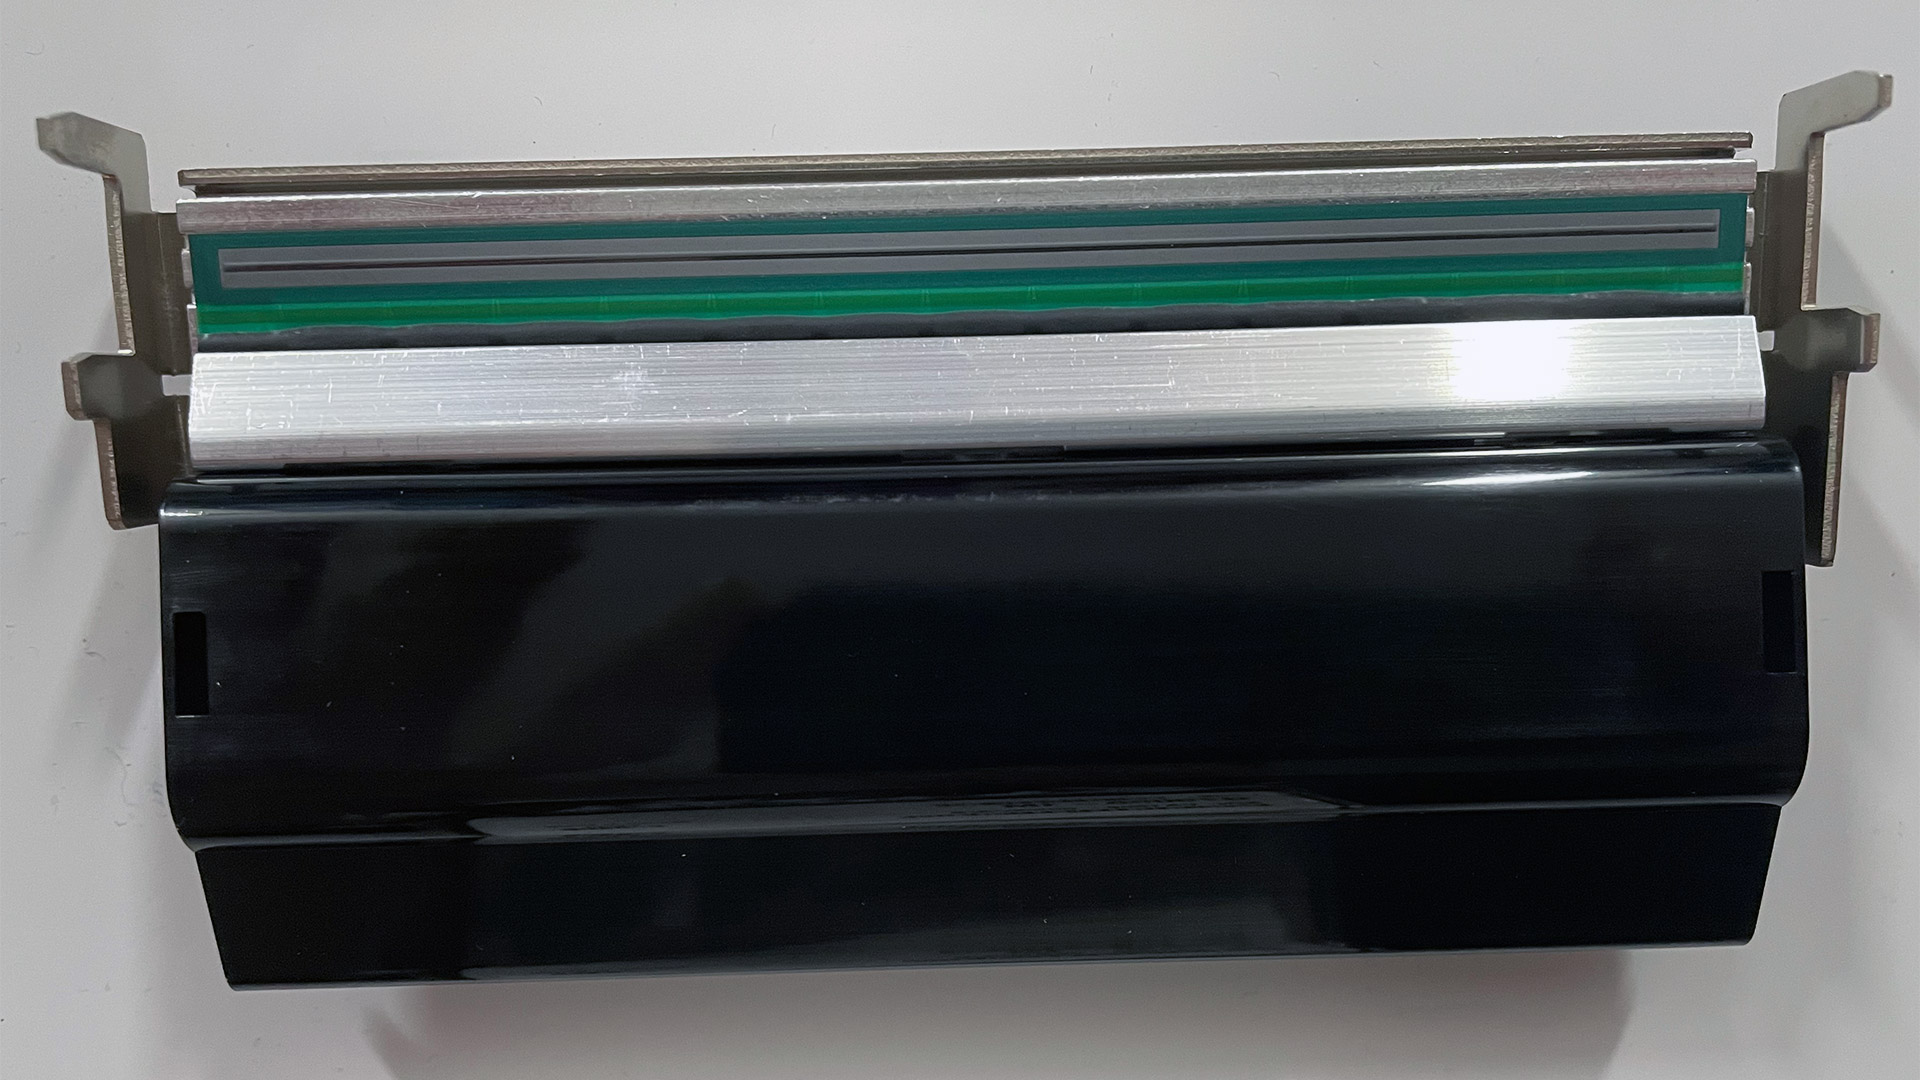 Bottom Side
That is one clean printhead! You can see the reflection of my hand and cell phone in the black plastic. Wow.
We're just going to drop this bad-boy into our Z4M+ and do some test prints.
The printout is lighter than our original printhead but absolutely clear! The difference in density was a common thing for Zebras, which is why darkness adjustments were sometimes required.
Connection.
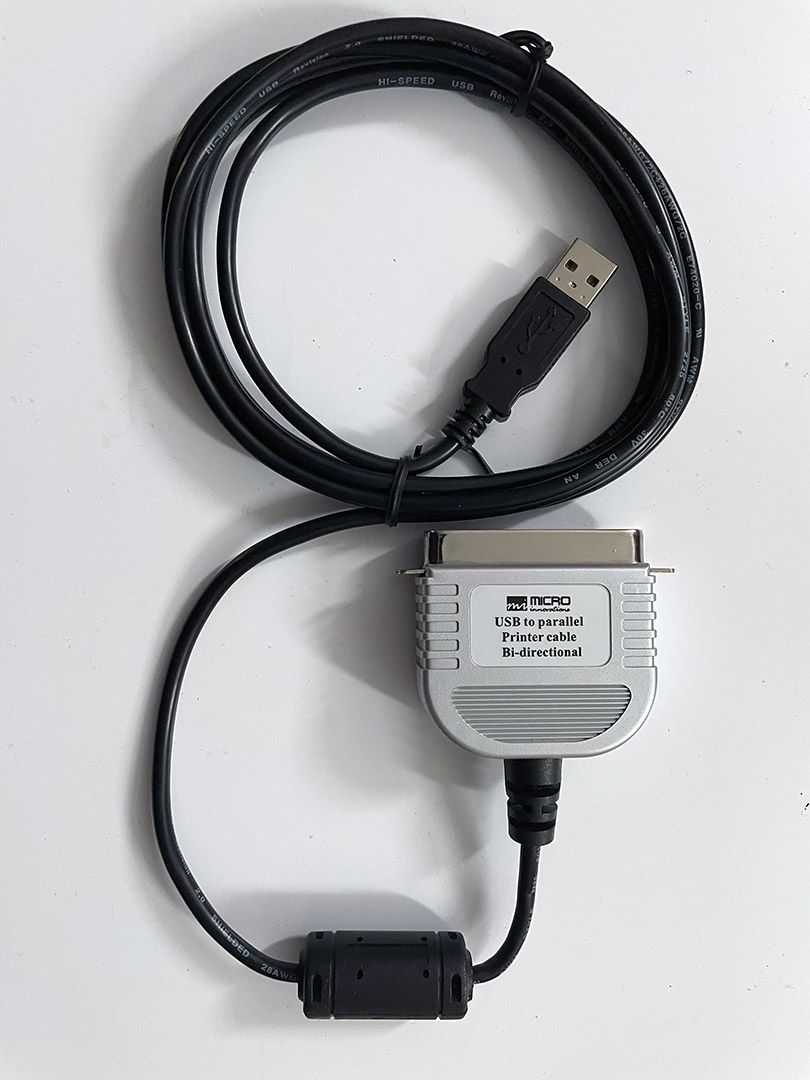
 Driver-wise, you can go to Seagull Scientific to get a driver for a modern Windows OS without a problem. But we know there will be some kids who will look at the interface in the back and go.
How am I supposed to hook this printer up grandpa? My PC has none of this! - Legit kid in the real when we showed them this printer.
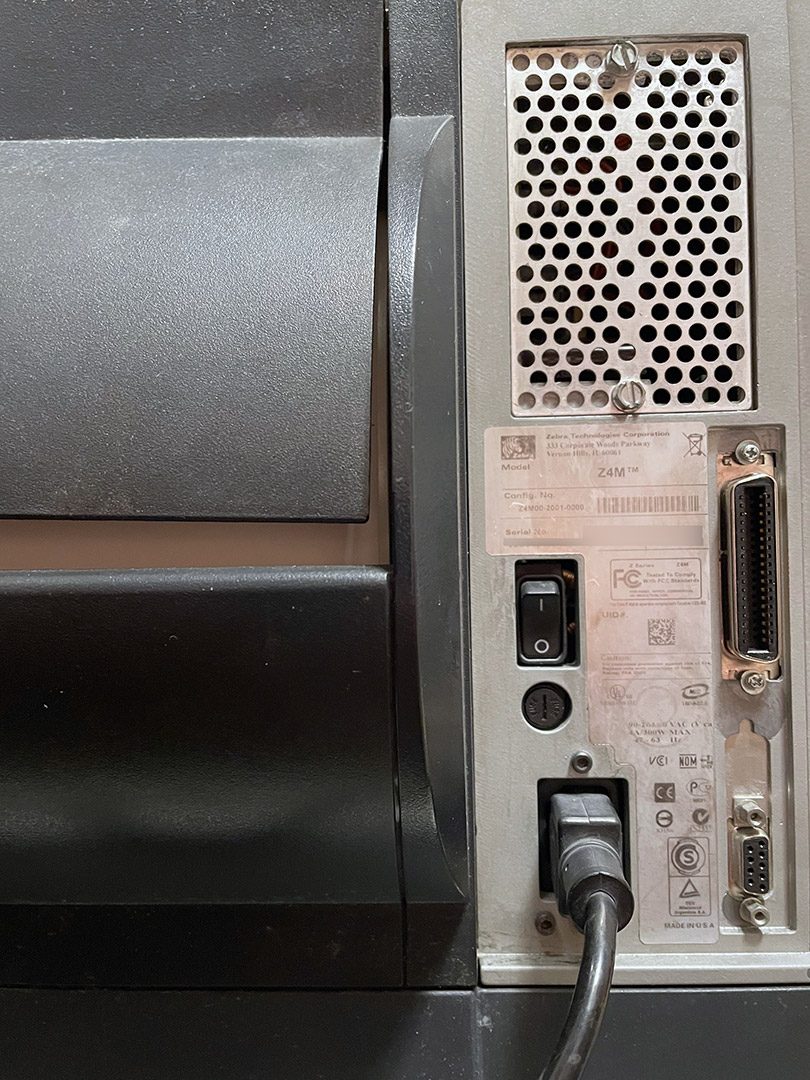
Parallel connectivity
Despite the kid being a bit of a dick. The Centronic 36 connector used for parallel port and the DB9 female port for Serial connectivity can be easily done this very day. The 1000 series Z4M+ had a female DB25 serial port similar to older 16-bit machines like the Amiga, which is why the bracketing is a little weird on the 2000 series.

One way of going about it with a new PC is just to embrace tradition and add a PCI card into your system with all of the ports required. These were pulled out of Dell machines because not only is the industrial sector behind the times when it comes to interfaces, but the retail sector is as well, with receipt printers. No drivers required for these, as the OS will simply see these cards and auto-assign a driver. From there, you will probably need to tell your driver it's in LPT1 for parallel or COM1 for serial. And of course, get the appropriate connection cables.
Startech is one of many companies that sell cards like this.
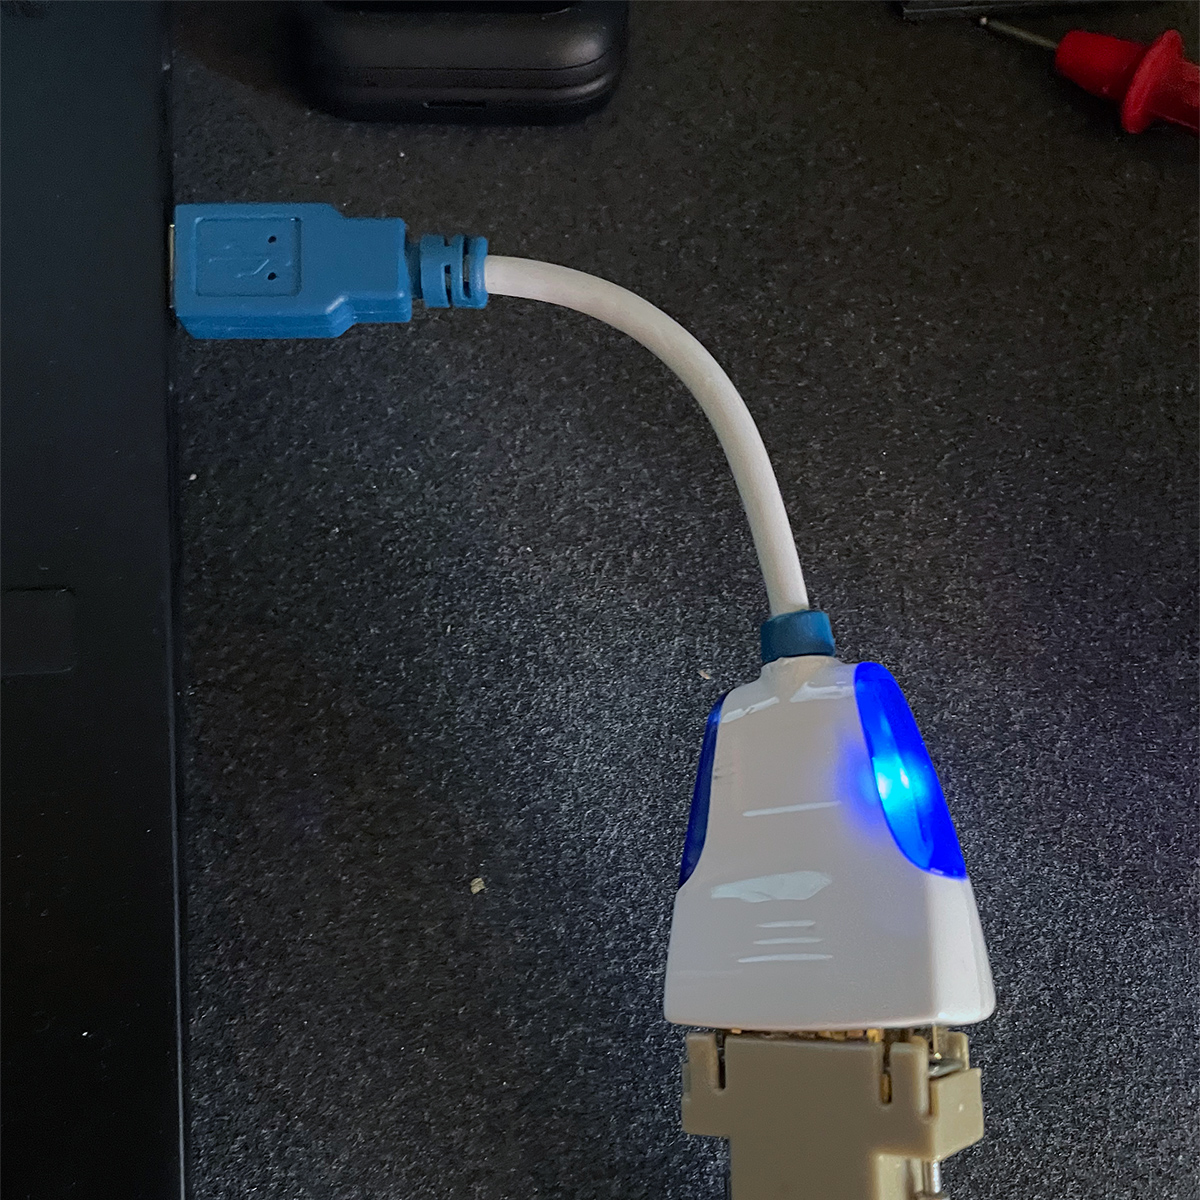
Another way is to just do the USB conversion yourself. These kinds of cards can fluctuate in price from $10 to $30 USD. We found this one at Goodwill for $2, and it works beautifully, setting it to USB001: port for our printer driver.
Added bonus: no need to worry about getting connection cables. It's an all-in-one solution.
Serial Connectivity
You can, of course, do the same with the serial port on the Zebra as well. Using a cable from FTDI, this particular cable has status lights showing if we're transmitting or not. Handy for troubleshooting.
But as you can see on the interface, it's not an all-in-one solution as you will still need a cable to jumper between this interface and the printer.
This will show up as a COM: port, but like the serial, you need to determine the baud rate to establish comms with the Zebra Printer, whereas the USB-Parallel is mostly plug-and-go.
Note: Even with the proper cabling hooked up. It still refused to talk to the Zebra Z4M+. We found out that the settings for communication were set for "Zebra" instead of "None" which then puts the printer into RAW mode for us to send a Windows test command over.
Bluetooth serial connectivity?
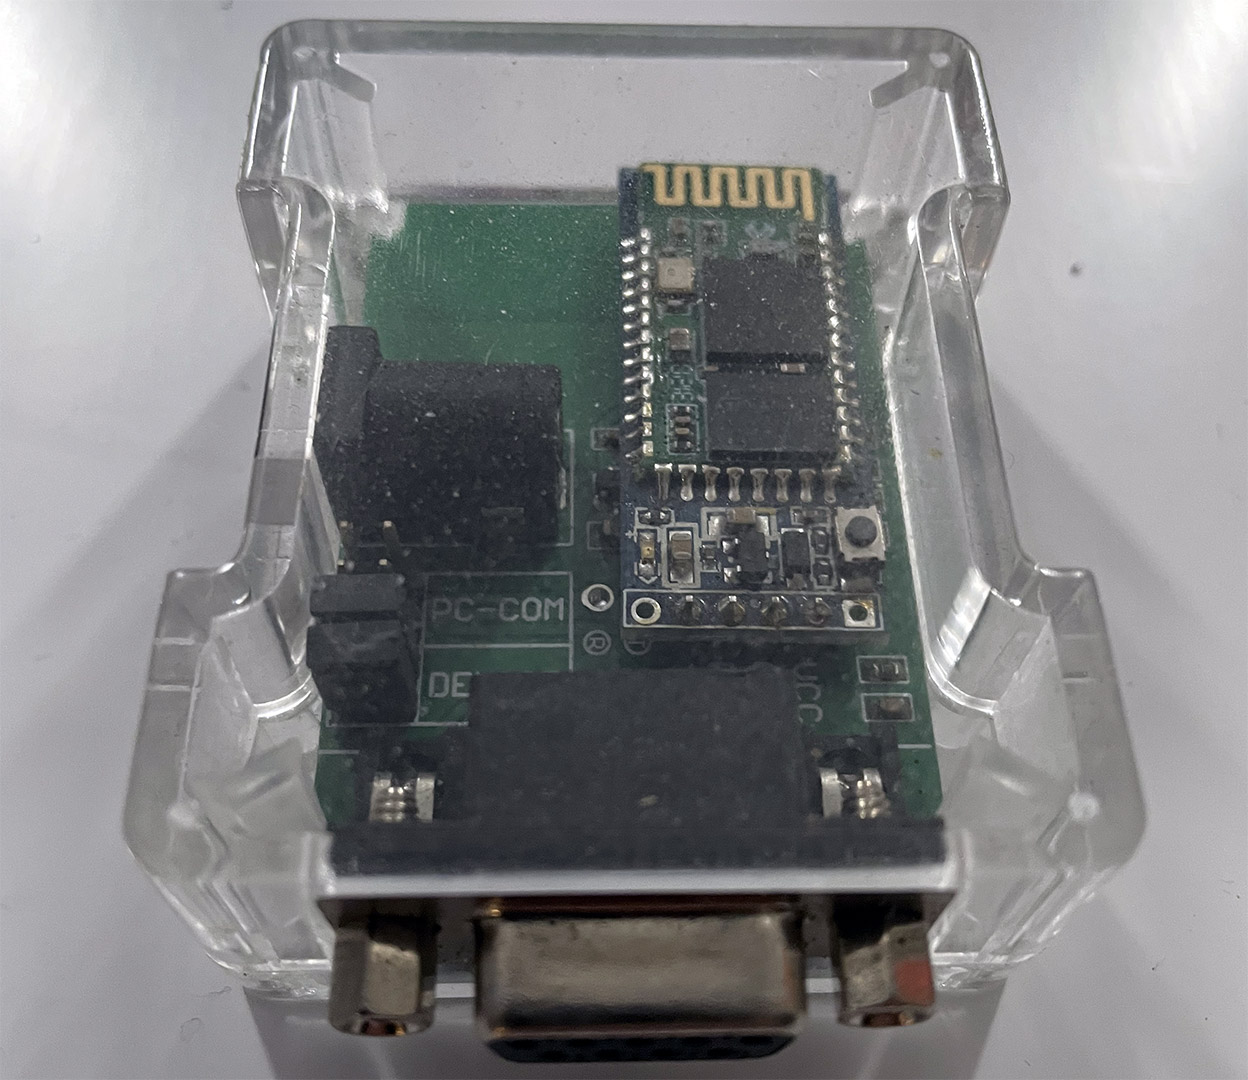
For those who want to enter a very special layer of configuration hell, there are Bluetooth-to-Serial adapters out there. Where you set it to master to configure your ID/Pin/baudrate settings, then switch to slave so it can show up on your computer as a virtualized serial port of COM#:
Extras and other info about serial connectivity over to Zebra.

If you're going to use the FTDI cable or bluetooth. During my travels working with old PLCs, I usually have in my kit these DB9 male/female and one DB25 male adapter, all going to RJ45. And two of them are wired in cross-over, or otherwise known as "Null Modem" configuration. You can tell which ones are the crossovers as we etched an "X" on the top. This is what the Zebra needs for serial connectivity.
As RJ45 only has 8 pins, we sacrificed pin 9, which is the Ring indicator required for modems. Last time I had to modem into a robot to program it was 13 years ago. It sucked.
On top of this. I can easily get a CAT5 network cable within most factories. Getting a null modem adapter or a serial cable would be considerably harder. Microcenter may still have them. But Best Buy? Nope! Then again, Best Buy is useless on many levels.
External Network adapters.
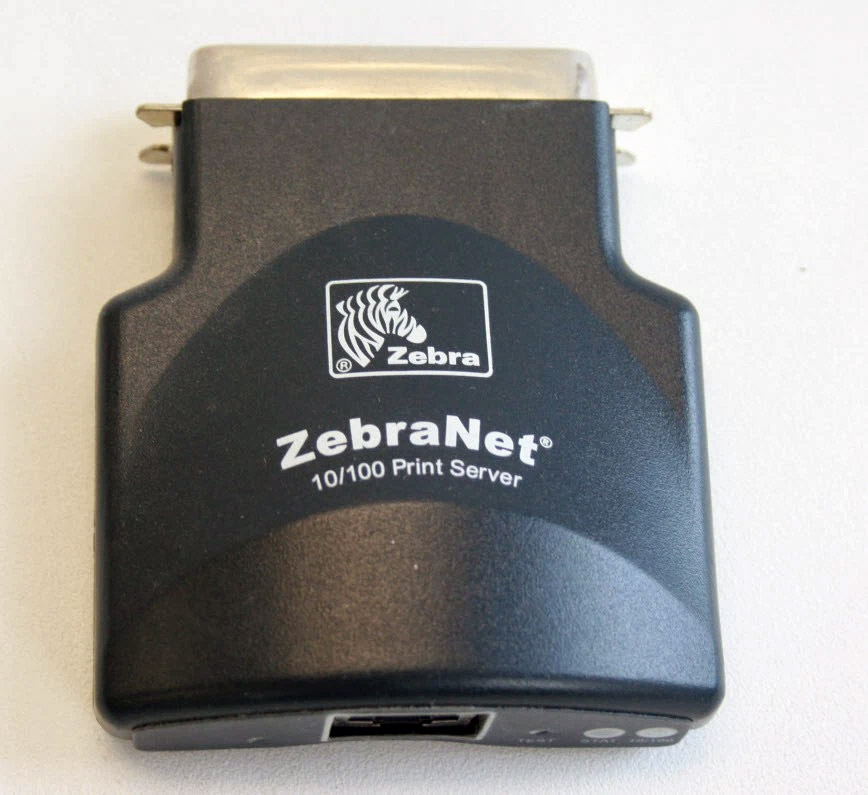
External cards like the one above or internal cards for the Zebra are available if you want to hard-wire it into your router and configure it via the web. There are also third-party print servers such as Axis, which can do something similar. But the ZebraNet cards (Especially if you get your hands on an internal version) are a little nicer in that you can configure a lot of the control panel settings of the Zebra Printer remotely.
Powering up.
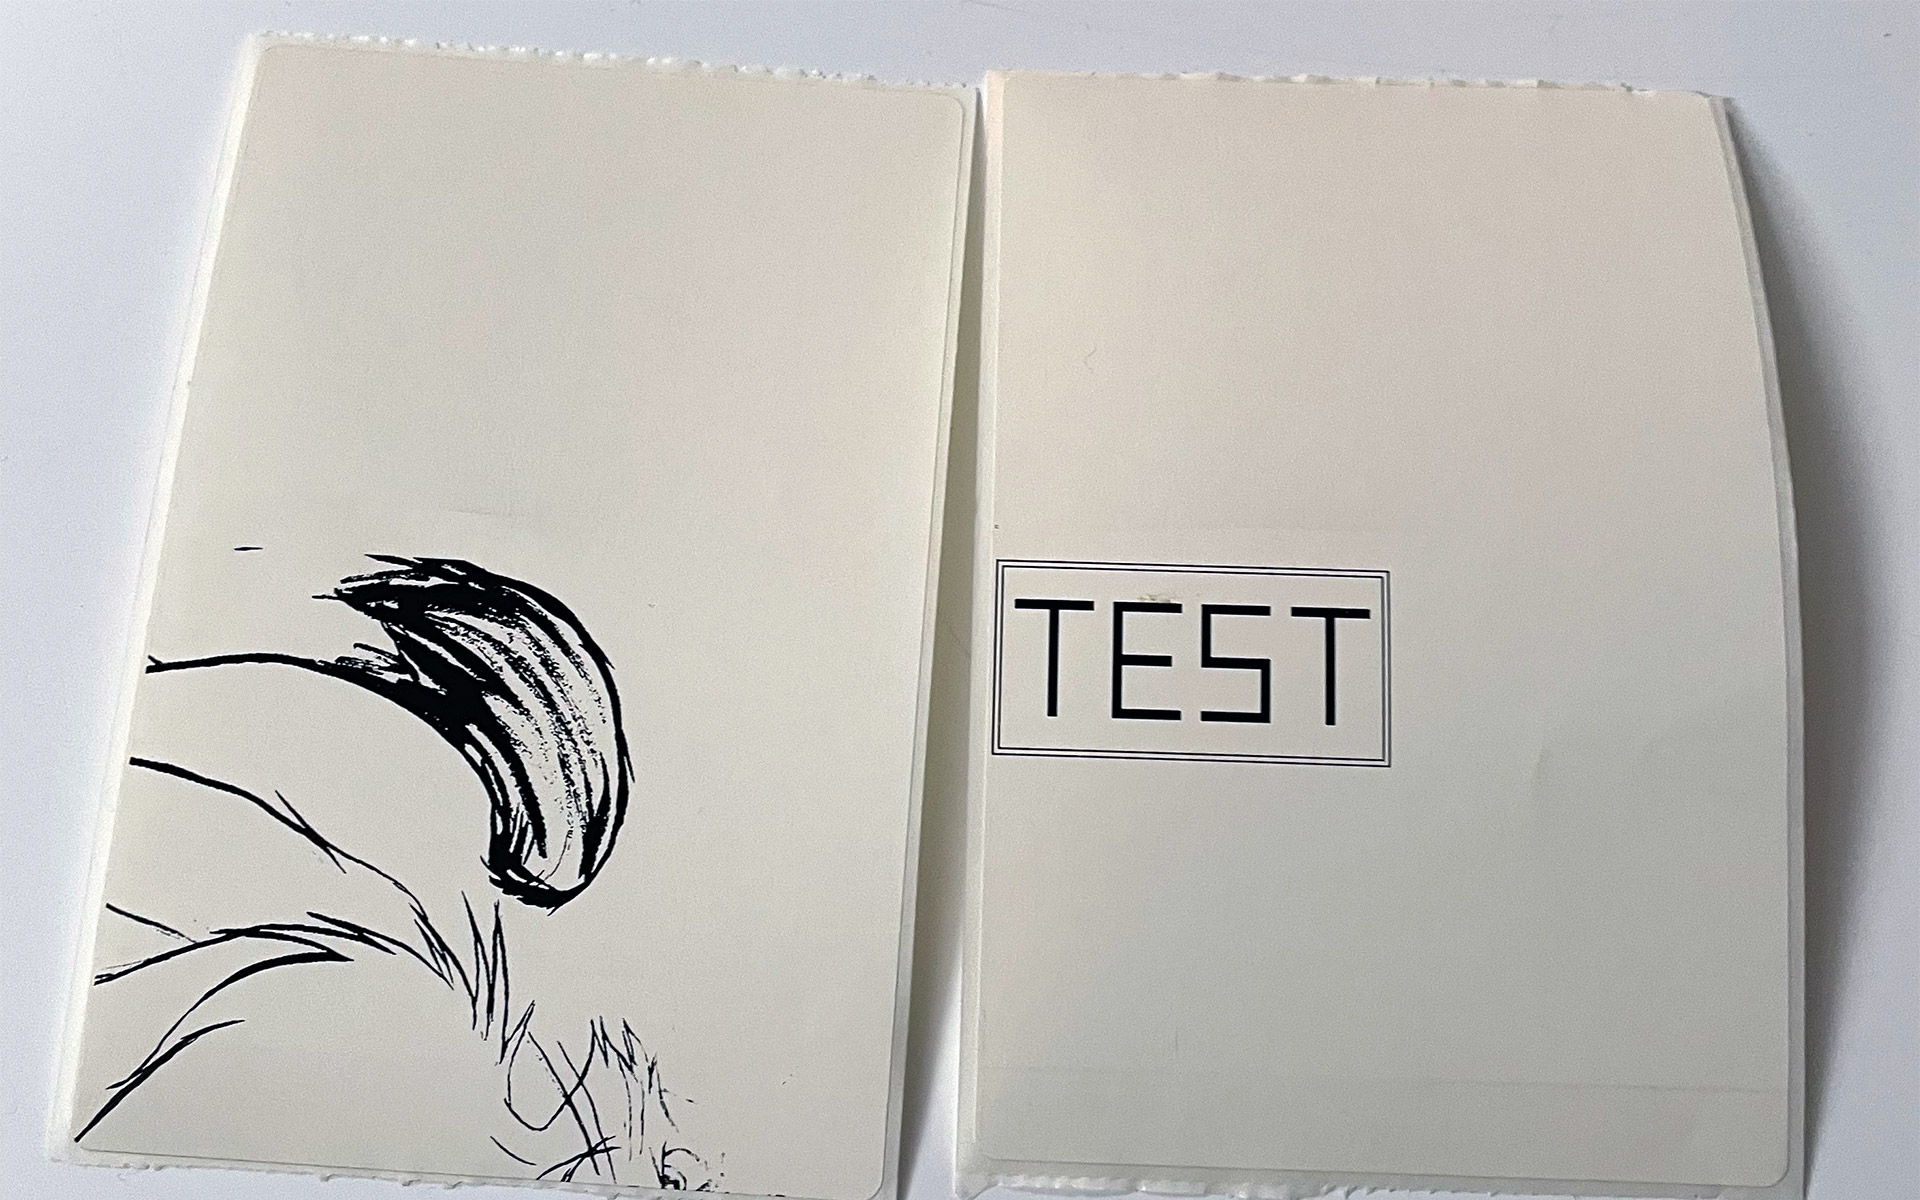
We decided to load up some of my artwork and print it. THEN run the internal test sequence from Windows.. That Test logo should be at the top of the label. Not in the middle. Also, the art is fading away on the right, which is an easy fix, as we just had to adjust the head springs to sync with the new pressure roller. But it is not reaching up to the top means the zebra thinks the label is 12+ inches instead of 6.
We first found in the menus of the Zebra (Password: 1234 in case it's locked) that maximum media was set for 3 inches.. It needs to be set larger than the media you detect. Or else it'll always error out.
Then I found the media LED was set for like 20.. cranked that up to 100.. which helped with the media sensor check.
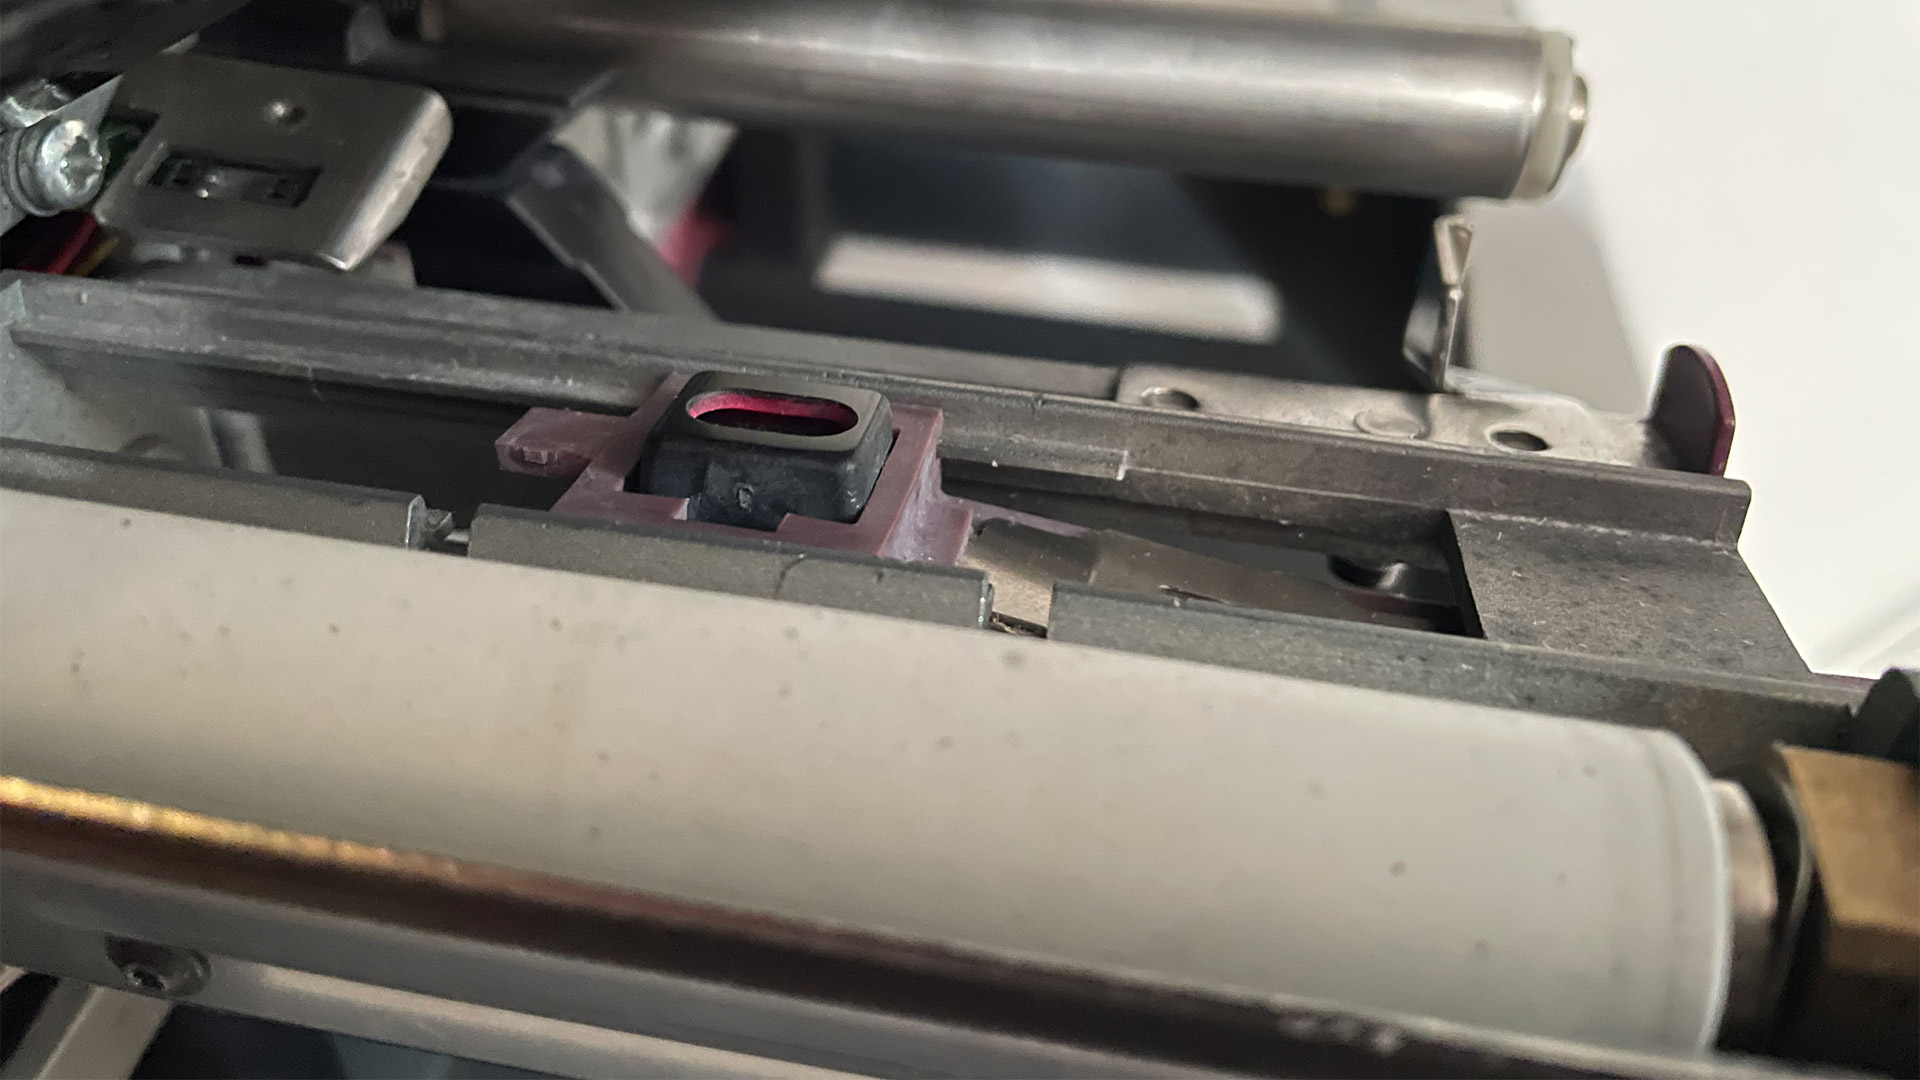
These media sensors have been known to fail. Second time we were lucky, because ours was just dirty. So after we Q-tip cleaned the sensor with alcohol. Adjusted to the middle of the printhead. The false paper-out messages disappeared and calibrated to the length of the printer.
We re-ran the sensor test and made a much healthier calibration. Bringing the label right up to the edge where it belongs.
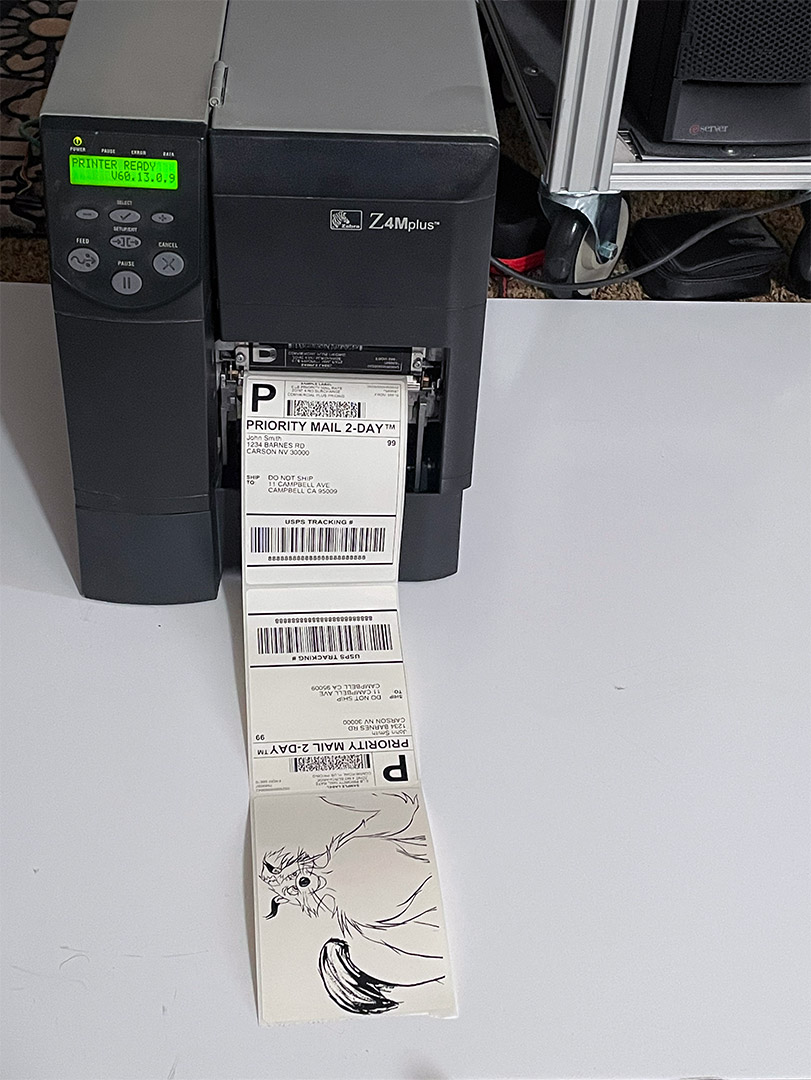
Test postal labels, random black and white sketches from my artwork. The Zebra is printing it all like a champ, finally resolving the media sensor issue once and for all. There was one last thing we did, which is going back into the menus and setting the "Tear off to +024 for our printer. so that the perforated labels line up perfectly to the tear-off bar. But beyond that. We're ready to print some labels with this printer!
Final thoughts.
A printer like the Zebra Z4M+ is absolutely overkill for an individual such as running a small eBay store. But even if you went with a wax ribbon ($25 USD) and a thermal transfer roll ($20-30USD) for a 4x6 with a quantity of 1000 shipping labels. The grand total per label is about 5 cents using the worst-case scenario. Thus, when you're working with eBay, your shipping label, and even your receipt that you could write up in Word, can all be printed and ready to rock.
Looking beyond just shipping. Using thermal transfer rolls has its advantages over direct thermal in that if you labeling something like storage containers or parts shelves. That label will not fade over time like direct thermal rolls would do to you.
Because of how he lucked the fuck out on the printhead. We technically didn't need anything from our Z4000. Which could mean ANOTHER printer in my apartment. But nope, we're dismantling the Z4000 because it's worth far more in parts than it is to be sold as a whole unit. We got ourselves a Z4M+ to replace it with. We probably repaired hundreds of these machines.
It should also be noted that we're not affiliated with Zebra in any manner. There are other thermal companies we worked on as well, such as Monarch and Intermec. But a lot of customers gravitated towards Zebra as, despite their price (Z4M+ upon release was close to $1,800 USD), the support was just that good. And as you could see. A printer made 20+ years ago is still kicking today. Which is great considering when you look at modern thermal printers like the GK420. Not much has changed except for size. It's still 200dpi because shipping labels do not need any more detail.
And that's what server said.
+++ END OF LINE.
cool printer man
Do thermal printers have the ability to fingerprint everything they print on? I would guess that because they're less resolute than laser printers there's no government mandated firmware that hides digital taggents all over every print so the serial number and chain of custody can be identified like with say color laserprinters.
I don't think they can.
Fingerprinting usually involves some kind of technique to hide or obscure a unique identifier from plain view. It's why color inkjet printers are prone to this because of the yellow. Even then, i'm not even sure how accurate the fingerprint will be. For example, on a laserprinter if the fingerprint is based off what is called the 'formatter board' and you replace that board with one from another printer. Or better yet, get access to the service menus and change the serial number totally. Is that enough for a government entity to really track you down? Perhaps if they do break into your house to collect evidence then they could link the printer to you. But that's a rather extreme scenario.
Getting back to thermal printers. I don't think they can fingerprint without it looking obvious.. such as missing dots in the printout (most printheads are 203dpi. about the quality of a fax machine) or if you use a wax roll like I do perhaps putting a wave pattern in it.. but again, if your printheads are well calibrated, you'd notice. or would consider that wax roll defective.
Anyhow, thanks for responding to this article.
- S
Perfect for art. A long time ago, I followed a tumblr user (I don't even know if they still exist) who printed 8-bit art with a thermal printer. I had bought a pack from them. Those stickers kept their ink for many years on one of my sketchbooks.